Introduction
In my previous tutorial, Understanding ROS 2, I provided an overview of ROS 2, its features, and its significance in the robotics community. Now, it’s time to get hands-on and set up your ROS 2 environment. In this tutorial, I will guide you through the installation process of ROS 2 on your system, ensuring you have a functional ROS 2 setup ready for your robotics projects.
Prerequisites
While ROS 2 can be installed on various operating systems, this tutorial focuses on installing ROS 2 on Ubuntu, which is the most commonly used platform for ROS development. Ensure you have the following prerequisites:
- A 64-bit version of Ubuntu 20.04 (Focal Fossa), 22.04 (Jammy Jellyfish), or 24.04 (Noble Numbat) installed on your machine.
- A user account with sudo privileges.
- Basic knowledge of using the terminal and command-line interface.
- An active internet connection to download the necessary packages.
ROS 2 can be installed from binary packages or built from source. In this tutorial, we will focus on installing ROS 2 using binary packages, which is the recommended method for most users.
Step 1: Set Up Your Sources
Before installing ROS 2, you need to set up your system to accept software from the ROS 2 repositories. Open a terminal and run the following commands:
sudo apt update
sudo apt install -y software-properties-common
sudo add-apt-repository universe
Step 2: Configure the Locales
ROS 2 requires UTF-8 locales to be set up on your system. You can configure the locales by running the following commands:
sudo apt update && sudo apt install locales
sudo locale-gen en_US en_US.UTF-8
sudo update-locale LC_ALL=en_US.UTF-8 LANG=en_US.UTF-8
export LANG=en_US.UTF-8

locale  # verify settings
Step 3: Add the ROS 2 Repository
Next, you need to add the ROS 2 repository to your system’s package sources. Run the following commands:
sudo apt update && sudo apt install curl -y
export ROS_APT_SOURCE_VERSION=$(curl -s https://api.github.com/repos/ros-infrastructure/ros-apt-source/releases/latest | grep -F "tag_name" | awk -F\" '{print $4}')
curl -L -o /tmp/ros2-apt-source.deb "https://github.com/ros-infrastructure/ros-apt-source/releases/download/${ROS_APT_SOURCE_VERSION}/ros2-apt-source_${ROS_APT_SOURCE_VERSION}.$(. /etc/os-release && echo ${UBUNTU_CODENAME:-${VERSION_CODENAME}})_all.deb"
sudo dpkg -i /tmp/ros2-apt-source.deb
sudo apt update
sudo apt upgrade -y
Step 4: Install ROS 2
Now that your system is set up to access the ROS 2 repositories, you can install ROS 2. There are several ROS 2 installation options available, depending on your needs. For a complete desktop installation, run the following command:
sudo apt install ros-<distro>-desktop
Replace <distro> with the name of the ROS 2 distribution you want to install.
I recommend installing LTS distributions for better stability, and long-term support. While non-LTS distributions may have the latest features, they might not be as stable for production use, and they have a shorter support cycle (18 months). LTS distributions receive updates and support for five years, making them more suitable for long-term projects.
Here are the available LTS distributions:
- For Ubuntu 22.04, replace
<distro>withhumble. - For Ubuntu 24.04, replace
<distro>withjazzy. - For Ubuntu 26.04 (from May 2026), replace
<distro>withlyrical.
If you prefer a minimal installation, recommended for headless systems or robot deployments, you can install the ROS 2 base package:
sudo apt install ros-<distro>-base
Step 5: Install Development Tools
To develop ROS 2 packages or compile packages from source, you will need to install additional development tools and ROS 2 build tools. Run the following command:
sudo apt update && sudo apt install ros-dev-tools
Step 6: Set Up Your Environment
Once ROS 2 is installed, you need to set up your environment to use ROS 2 commands and tools. You can do this by sourcing the ROS 2 setup script. Add the following line to your ~/.bashrc file:
source /opt/ros/<distro>/setup.bash
Replace <distro> with the name of the ROS 2 distribution you installed.
After editing your ~/.bashrc file, run the following command to apply the changes:
source ~/.bashrc
Step 7: [Optional] Create a ROS 2 Workspace
While not strictly necessary for using ROS 2, creating a ROS 2 workspace is recommended for developing your own packages and managing your projects. To create a ROS 2 workspace, follow these steps:
mkdir -p ~/ros2_ws/src
cd ~/ros2_ws
colcon build
ros2_ws is the name of your workspace, and you can replace it with any name you prefer.
After building your workspace, source the workspace setup script by adding the following line to your ~/.bashrc file:
source ~/ros2_ws/install/setup.bash
Then, apply the changes by running:
source ~/.bashrc
A Useful ROS 2 Terminal Configuration
When I open a new terminal console, I like to view all the environment variables related to ROS 2. To do this, I create a custom configuration file to be sourced by the ~/.bashrc file.
Open a new file called .ros2_config.bash in your home directory:
gedit ~/.ros2_config.bash
You can use nano instead of gedit if you prefer a terminal-based text editor.
Then, copy and paste the following code into the file:
#############################################################################
# ROS
machine_ip=(`hostname -I`)
dist=jazzy # Options: humble, jazzy, lyrical, rolling
domain_id=0
ws_path=~/ros2_ws
#############################################################################
# Configuration
export ROS_DOMAIN_ID=${domain_id}
# Distribution path
source /opt/ros/${dist}/setup.bash
# Devel paths
source ${ws_path}/install/local_setup.bash
# Middleware
export RMW_IMPLEMENTATION=rmw_fastrtps_cpp
#############################################################################
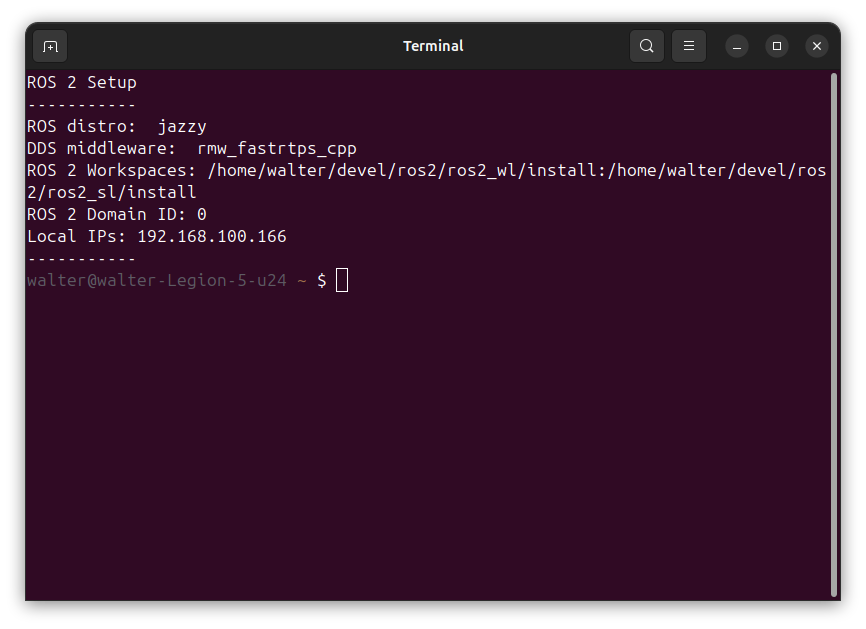
echo "ROS 2 Setup"
echo "-----------"
echo 'ROS distro: ' $ROS_DISTRO
echo 'DDS middleware: ' $RMW_IMPLEMENTATION
echo 'ROS 2 Workspaces:' $COLCON_PREFIX_PATH
echo 'ROS 2 Domain ID:' $ROS_DOMAIN_ID
echo 'Local IPs:' $(hostname -I)
echo "-----------"
Then, add this line to the end of your ~/.bashrc file:
source ~/.ros2_config.bash
Now, every time you open a new terminal, your ROS 2 environment will be set up according to your preferences, and you’ll see a summary of your ROS 2 configuration:
In future tutorials, I will explain in detail the meaning of the environment variables ROS_DOMAIN_ID and RMW_IMPLEMENTATION, and how to use them effectively in your ROS 2 projects.
Conclusion
In this tutorial, you learned how to install ROS 2 on your system, set up your environment, and create a custom terminal configuration for a better development experience. By following these steps, you can ensure that your ROS 2 environment is tailored to your needs and that you have quick access to important information about your setup.
With ROS 2 installed and configured, you’re now ready to start exploring the powerful features of ROS 2 and begin developing your own robotics applications. In the next tutorial, we will dive into creating and managing ROS 2 packages, so stay tuned!