Introduction
In my previous tutorial, Understanding ROS 2, I provided an overview of ROS 2, its features, and its significance in the robotics community. Now, it’s time to get hands-on and set up your ROS 2 environment. In this tutorial, I will guide you through the installation process of ROS 2 on your system, ensuring you have a functional ROS 2 setup ready for your robotics projects.
Prerequisites
While ROS 2 can be installed on various operating systems, this tutorial focuses on installing ROS 2 on Ubuntu, which is the most commonly used platform for ROS development. Ensure you have the following prerequisites:
- A 64-bit version of Ubuntu 20.04 (Focal Fossa), 22.04 (Jammy Jellyfish), or 24.04 (Noble Numbat) installed on your machine.
- A user account with sudo privileges.
- Basic knowledge of using the terminal and command-line interface.
- An active internet connection to download the necessary packages.
ROS 2 can be installed from binary packages or built from source. In this tutorial, we will focus on installing ROS 2 using binary packages, which is the recommended method for most users.
This guide applies to Debian-based Linux distributions and supports both x86_64 and ARM64 architectures.
Step 1: Set Up Your Sources
Before installing ROS 2, you need to set up your system to accept software from the ROS 2 repositories. Open a terminal and run the following commands:
sudo apt update
sudo apt install -y software-properties-common
sudo add-apt-repository universe
Step 2: Configure the Locales
ROS 2 requires UTF-8 locales to be set up on your system. You can configure the locales by running the following commands:
sudo apt update && sudo apt install locales
sudo locale-gen en_US en_US.UTF-8
sudo update-locale LC_ALL=en_US.UTF-8 LANG=en_US.UTF-8
export LANG=en_US.UTF-8
Verify that the locale settings are correct:
locale # verify settings
The correct output should look like:
LANG=en_US.UTF-8
LANGUAGE=
LC_CTYPE="en_US.UTF-8"
LC_NUMERIC="en_US.UTF-8"
LC_TIME="en_US.UTF-8"
LC_COLLATE="en_US.UTF-8"
LC_MONETARY="en_US.UTF-8"
LC_MESSAGES="en_US.UTF-8"
LC_PAPER="en_US.UTF-8"
LC_NAME="en_US.UTF-8"
LC_ADDRESS="en_US.UTF-8"
LC_TELEPHONE="en_US.UTF-8"
LC_MEASUREMENT="en_US.UTF-8"
LC_IDENTIFICATION="en_US.UTF-8"
LC_ALL=en_US.UTF-8
Step 3: Add the ROS 2 Repository
Next, you need to add the ROS 2 repository to your system’s package sources. Run the following commands:
sudo apt update && sudo apt install curl -y
export ROS_APT_SOURCE_VERSION=$(curl -s https://api.github.com/repos/ros-infrastructure/ros-apt-source/releases/latest | grep -F "tag_name" | awk -F\" '{print $4}')
curl -L -o /tmp/ros2-apt-source.deb "https://github.com/ros-infrastructure/ros-apt-source/releases/download/${ROS_APT_SOURCE_VERSION}/ros2-apt-source_${ROS_APT_SOURCE_VERSION}.$(. /etc/os-release && echo ${UBUNTU_CODENAME:-${VERSION_CODENAME}})_all.deb"
sudo dpkg -i /tmp/ros2-apt-source.deb
sudo apt update
sudo apt upgrade -y
These commands automatically detect and install the latest ROS APT source package for your Ubuntu codename. They also ensure you can receive future ROS 2 package updates using the standard sudo apt upgrade -y command.
Step 4: Install ROS 2
Now that your system is set up to access the ROS 2 repositories, you can install ROS 2. There are several ROS 2 installation options available, depending on your needs. For a complete desktop installation, run the following command:
sudo apt install ros-<distro>-desktop
Replace <distro> with the name of the ROS 2 distribution you want to install.
I recommend installing LTS distributions for better stability, and long-term support. While non-LTS distributions may have the latest features, they might not be as stable for production use, and they have a shorter support cycle (18 months). LTS distributions receive updates and support for five years, making them more suitable for long-term projects.
Here are the available LTS distributions:
- For Ubuntu 22.04, replace
<distro>withhumble. - For Ubuntu 24.04, replace
<distro>withjazzy. - For Ubuntu 26.04 (from May 2026), replace
<distro>withlyrical.
If you prefer a minimal installation, recommended for headless systems or robot deployments, you can install the ROS 2 core packages:
sudo apt install ros-<distro>-ros-core
Step 5: Install Development Tools
To develop ROS 2 packages or compile packages from source, you will need to install additional development tools and ROS 2 build tools. Run the following command:
sudo apt update && sudo apt install ros-dev-tools
Initialize rosdep:
sudo rosdep init
rosdep update
Step 6: Set Up Your Environment
Once ROS 2 is installed, you need to set up your environment to use ROS 2 commands and tools. You can do this by sourcing the ROS 2 setup script. Add the following line to your ~/.bashrc file:
source /opt/ros/<distro>/setup.bash
Replace <distro> with the name of the ROS 2 distribution you installed.
After editing your ~/.bashrc file, run the following command to apply the changes:
source ~/.bashrc
Step 7: [Optional] Create a ROS 2 Workspace
While not strictly necessary for using ROS 2, creating a ROS 2 workspace is recommended for developing your own packages and managing your projects. To create a ROS 2 workspace, follow these steps:
mkdir -p ~/ros2_ws/src
cd ~/ros2_ws
colcon build
ros2_ws is the name of your workspace, and you can replace it with any name you prefer.
Running colcon build on an empty src directory simply creates the workspace structure; it will finish quickly without building anything.
After creating your workspace, source the workspace setup script by adding the following line to your ~/.bashrc file:
source ~/ros2_ws/install/setup.bash
Then, apply the changes by running:
source ~/.bashrc
After this, you can verigy that your ROS 2 environment is set up correctly by running:
echo $COLCON_PREFIX_PATH
to verify that the workspace paths are included in your ROS 2 environment. You should see the path to your workspace’s install directory in the output.
Then, you can also use this command:
ros2 pkg list
to verify that ROS 2 packages are available in your environment. You should see a list of ROS 2 packages, confirming that your installation is successful:
action_msgs
action_tutorials_cpp
action_tutorials_interfaces
action_tutorials_py
actionlib_msgs
actuator_msgs
ament_black
ament_clang_format
ament_cmake
[...]
A Useful ROS 2 Terminal Configuration
When I open a new terminal console, I like to view all the environment variables related to ROS 2. To do this, I create a custom configuration file to be sourced by the ~/.bashrc file.
Open a new file called .ros2_config.bash in your home directory:
gedit ~/.ros2_config.bash
You can use nano instead of gedit if you prefer a terminal-based text editor.
Then, copy and paste the following code into the file:
#############################################################################
# ROS

machine_ip=(`hostname -I`)

# You MUST set dist to the ROS 2 distribution you installed (humble, jazzy, lyrical, or rolling).
dist=jazzy # Options: humble, jazzy, lyrical, rolling

domain_id=0

ws_path=~/ros2_ws

#############################################################################
# Configuration

export ROS_DOMAIN_ID=${domain_id}

# Distribution path
source /opt/ros/${dist}/setup.bash

# Devel paths
source ${ws_path}/install/local_setup.bash

# Middleware
export RMW_IMPLEMENTATION=rmw_fastrtps_cpp

#############################################################################

echo "ROS 2 Setup"
echo "-----------"
echo 'ROS distro: ' $ROS_DISTRO
echo 'DDS middleware: ' $RMW_IMPLEMENTATION
echo 'ROS 2 Workspaces:' $COLCON_PREFIX_PATH
echo 'ROS 2 Domain ID:' $ROS_DOMAIN_ID
echo 'Local IPs:' $(hostname -I)
echo "-----------"
Then, add this line to the end of your ~/.bashrc file:
source ~/.ros2_config.bash
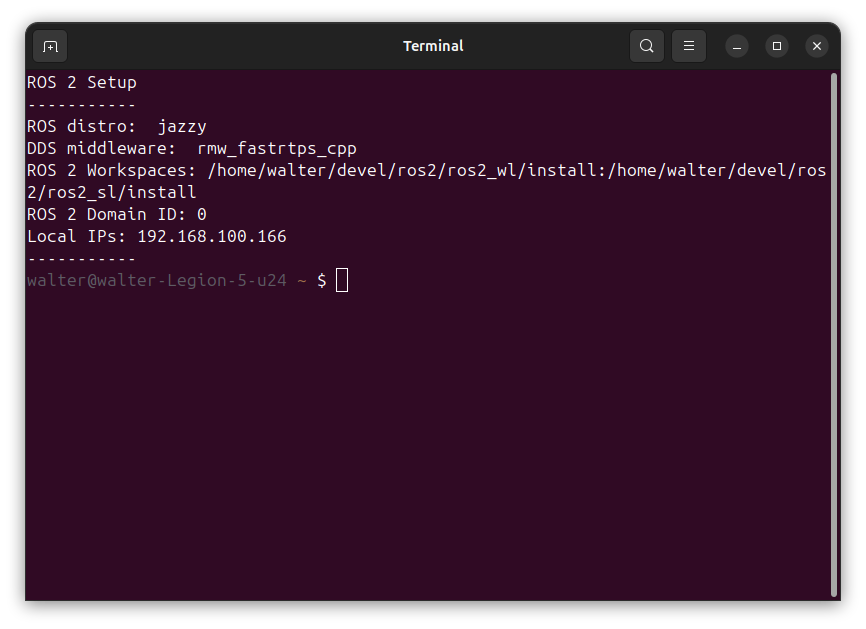
Now, every time you open a new terminal, your ROS 2 environment will be set up according to your preferences, and you’ll see a summary of your ROS 2 configuration:
In future tutorials, I will explain in detail the meaning of the environment variables ROS_DOMAIN_ID and RMW_IMPLEMENTATION, and how to use them effectively in your ROS 2 projects.
Conclusion
In this tutorial, you learned how to install ROS 2 on your system, set up your environment, and create a custom terminal configuration for a better development experience. By following these steps, you can ensure that your ROS 2 environment is tailored to your needs and that you have quick access to important information about your setup.
With ROS 2 installed and configured, you’re now ready to start exploring the powerful features of ROS 2 and begin developing your own robotics applications. In the next tutorial, we will dive into creating and managing ROS 2 packages, so stay tuned!
The next tutorial of this series explains how to start ROS 2 nodes: Starting ROS 2 Nodes.