Last update: August 25, 2026; verified against OpenCV 4.12+ and OpenCV 5.0.0.
Introduction
There is a particular kind of frustration that comes with wanting object detection in a project. You install PyTorch. Then CUDA-enabled PyTorch. Then a specific torchvision. Then a package that pins numpy<2. Two gigabytes of wheels later, your robot’s Jetson has no disk space left, and all you actually wanted was to know whether there is a person in front of the camera.
The alternative is much simpler than most people realise: OpenCV can run YOLO by itself. The dnn module loads an ONNX file, runs it on your NVIDIA® GPU through its CUDA backend, and hands you back a tensor. No PyTorch at runtime. No Python at runtime, if you do not want it. One dependency you almost certainly already have.
The catch is that OpenCV gives you a tensor, not a list of objects. Everything between “raw pixels” and “there is a dog at (312, 48, 190, 240)” is your job: the letterbox, the normalisation, the transposition, the confidence filtering, the non-maximum suppression, and the mapping back into the original frame. Get any one of those wrong and you get boxes that are subtly shifted, or objects that vanish near the image border, or a wall of duplicates.
This tutorial walks through every one of those steps, in Python and in C++, with the maths spelled out. It also covers the part that most guides skip: how to make sure the inference actually runs on the GPU, which on OpenCV 5 is no longer the default and announces itself with nothing more than two easily-missed warning lines.
We will use the COCO dataset’s 80 classes, because those are precisely the objects that fill an ordinary day: people, pets, cups, laptops, chairs, bottles, phones, cars, bicycles.
By the end of this tutorial you will be able to:
- Understand what COCO’s 80 classes give you and, just as importantly, what they do not.
- Export a YOLO model to ONNX in a form OpenCV’s DNN module can actually load.
- Build OpenCV with the CUDA DNN backend, and verify that it is being used.
- Explain the shape
1 x 84 x 8400and decode it correctly. - Write a complete real-time detector in Python and in C++.
- Recognise the handful of failure modes that produce “almost working” detections.
All the code on this page is available on GitHub, ready to clone and run: Myzhar/tutorial-opencv-yolo. The repository carries the Python and C++ detectors exactly as they are printed below, a model export script, and a test that checks both implementations against a reference produced by Ultralytics itself.
Prerequisites
- An NVIDIA® GPU with a known compute capability. If you are not sure what yours is, see my NVIDIA® CUDA™ Compute Capability tutorial; you will need that number to build OpenCV.
- CUDA™ Toolkit and cuDNN installed. The OpenCV DNN CUDA backend depends on cuDNN; there is no way around it.
- OpenCV 4.12.0 or newer (or 5.0.0), built with CUDA support. There is a condensed build recipe below, and a full step-by-step in Installing OpenCV 5 with CUDA and DNN Support on Ubuntu 24.04.
- Python 3.8+ for the export step and the Python example, or a C++17 toolchain for the C++ example.
- Basic familiarity with OpenCV
Mat/ndarrayhandling.
Note: The
opencv-pythonwheels you get frompipare not built with CUDA. They will acceptDNN_BACKEND_CUDA, print one warning to stderr, and then run on your CPU anyway. If you want GPU inference, you must build OpenCV from source. This is covered in Part 2.
Part 1: The model and its 80 everyday objects
What COCO actually gives you
COCO (Common Objects in Context) is a dataset of about 118,000 annotated training images covering 80 object categories. Those categories were not chosen to be exotic. They were chosen to be common, which is exactly why a COCO-trained model is the right starting point for everyday use.
Here is the full list, grouped by the kind of everyday problem each group solves:
| Group | Classes | Typical everyday use |
|---|---|---|
| People & animals |
person, bird, cat, dog, horse, sheep, cow, elephant, bear, zebra, giraffe
|
Presence detection, occupancy counting, pet monitoring, wildlife cameras |
| Vehicles & street |
bicycle, car, motorcycle, airplane, bus, train, truck, boat, traffic light, fire hydrant, stop sign, parking meter, bench
|
Driveway monitoring, traffic counting, parking availability |
| Bags & accessories |
backpack, umbrella, handbag, tie, suitcase
|
“Did I forget my bag?”, left-luggage alerts |
| Sport & outdoor |
frisbee, skis, snowboard, sports ball, kite, baseball bat, baseball glove, skateboard, surfboard, tennis racket
|
Sports analytics, activity logging |
| Kitchen & tableware |
bottle, wine glass, cup, fork, knife, spoon, bowl
|
Table-setting checks, cluttered-desk detection, hydration reminders |
| Food |
banana, apple, sandwich, orange, broccoli, carrot, hot dog, pizza, donut, cake
|
Fridge inventory, meal logging |
| Furniture |
chair, couch, potted plant, bed, dining table, toilet
|
Indoor scene understanding, robot navigation semantics |
| Electronics |
tv, laptop, mouse, remote, keyboard, cell phone
|
Desk monitoring, “phone on the table during dinner” detectors |
| Appliances |
microwave, oven, toaster, sink, refrigerator
|
Kitchen scene understanding, home robotics |
| Household items |
book, clock, vase, scissors, teddy bear, hair drier, toothbrush
|
Tidiness monitoring, object-finding assistants |
The class index order matters: the model outputs a score per class, in exactly this order, starting with person at index 0 and ending with toothbrush at index 79. Get the order wrong and every label in your output is wrong.
What COCO does not give you
This is the part worth being honest about before you build something on top of it:
-
No faces, no hands, no text.
personis a whole-body box. If you need faces, that is a different model. -
No fine-grained classes. A mug, a paper cup and an espresso cup are all
cup. A tabby and a Maine Coon are bothcat. -
No
door,window,stairs,wall,floor,light switch,plug. For indoor robotics this is a real gap; COCO is a photography dataset, not a building dataset. -
Small objects are hard. A
cell phoneat 20x30 pixels will be missed far more often than apersonfilling half the frame. -
dining tableis notoriously loose. It often fires on any large horizontal surface with things on it.
If your everyday problem lives outside these 80 classes, the pipeline in this tutorial is still exactly right; you just fine-tune the model on your own data and change the class list. Nothing else in the code changes.
Which YOLO to use
The YOLO family is large and the naming is chaotic. For an OpenCV DNN pipeline, the practical answer today is YOLO11: it is mature, widely used, its ONNX export is well tested against OpenCV, and, crucially, its output layout is the one OpenCV’s own samples document.
Here is the official COCO detection performance of the YOLO11 family, all trained at 640x640:
| Model | mAPval 50-95 | Speed CPU ONNX (ms) | Speed T4 TensorRT10 (ms) | Params (M) | FLOPs (B) |
|---|---|---|---|---|---|
| YOLO11n | 39.5 | 56.1 ± 0.8 | 1.5 ± 0.0 | 2.6 | 6.5 |
| YOLO11s | 47.0 | 90.0 ± 1.2 | 2.5 ± 0.0 | 9.4 | 21.5 |
| YOLO11m | 51.5 | 183.2 ± 2.0 | 4.7 ± 0.1 | 20.1 | 68.0 |
| YOLO11l | 53.4 | 238.6 ± 1.4 | 6.2 ± 0.1 | 25.3 | 86.9 |
| YOLO11x | 54.7 | 462.8 ± 6.7 | 11.3 ± 0.2 | 56.9 | 194.9 |
Source: Ultralytics YOLO11 documentation. The TensorRT column is not what you will get from OpenCV DNN; it is there to show the relative cost of each scale.
For everyday indoor use on a desktop GPU, YOLO11s is the sweet spot: n misses too many small objects, m and above rarely pay for themselves unless you are running offline.
(1, 300, 6)tensor of already-suppressed detections rather than the(1, 84, 8400)candidate grid we decode below. That is a nice simplification, but the decode is different, and the CUDA backend’s coverage of its operator set is not something I would rely on yet. If you try it, open the ONNX file in Netron and confirm the output layout before writing any parsing code; do not assume it is(x1, y1, x2, y2, conf, class_id)just because that is the usual convention.
Read this before you ship anything. Ultralytics YOLO models and code are released under AGPL-3.0 or a paid Enterprise licence. AGPL is a strong copyleft licence with a network clause: if you deploy a product that uses these weights, you may be required to release your own source. For a hobby project or internal research this is a non-issue. For a commercial product it very much is one. If AGPL does not work for you, YOLOX is Apache-2.0, is COCO-trained, and is explicitly supported by OpenCV’s DNN module, and the pipeline below works for it too, with a different pre-processing normalisation and an output layout that includes an objectness column.
Exporting the model to ONNX
OpenCV cannot read .pt files. We need ONNX. Install the exporter in a throwaway virtual environment; you only need it once, and it never has to touch your deployment machine:
python3 -m venv /tmp/yolo-export
source /tmp/yolo-export/bin/activate
pip install ultralytics onnx onnxslim
Then export:
yolo export model=yolo11s.pt format=onnx imgsz=640 opset=12 simplify=True dynamic=False nms=False
This downloads yolo11s.pt automatically and writes yolo11s.onnx next to it. Each argument matters:
| Argument | Why |
|---|---|
format=onnx |
The only format OpenCV’s DNN module reads for this model family. |
imgsz=640 |
Fixes the input resolution. Must match what your code feeds the network. |
opset=12 |
OpenCV’s classic engine is happiest with opset 12. Newer opsets pull in operators the CUDA backend may not implement, which silently pushes layers back onto the CPU. |
simplify=True |
Runs onnxslim to fold constants and collapse redundant subgraphs. This is the default, but be explicit; an unsimplified graph is a common source of “unsupported layer” errors. |
dynamic=False |
Critical. Dynamic input shapes force the CUDA backend to re-plan on every call, and often make it refuse the graph entirely. Fix the shape. |
nms=False |
Keeps NMS out of the graph. We want the raw candidate grid, because we are going to run OpenCV’s own NMS, which is faster and gives us per-class control. |
You can now deactivate and delete the virtual environment. The .onnx file is entirely self-contained.
Tip: the companion repository wraps all of the above in one script,
models/export_yolo11.sh, which builds the throwaway environment, exports the model, and prints the output shape so you can check it straight away.
Verify what you got before going further:
python3 -c "import onnx; m = onnx.load('yolo11s.onnx'); print(m.graph.output)"
You are looking for a single output of shape [1, 84, 8400]. If you see something else, stop and fix the export; every line of parsing code below depends on that shape.
Part 2: Getting OpenCV to actually use your GPU
This is the section that determines whether you get 60 FPS or 6 FPS, and it is the one where OpenCV is least helpful, because every failure here announces itself once, quietly, and then never again.
The OpenCV 5 engine trap
OpenCV 5 shipped in June 2026 with a completely rewritten DNN engine; I wrote about it in OpenCV 5 is Finally Here!. The rewrite is excellent: ONNX operator coverage jumped from roughly 22% to over 80%, with proper shape inference, constant folding and dynamic shapes.
It is also, as of 5.0.0, CPU-only.
OpenCV 5 therefore carries two engines, selected with a new parameter on every readNet* function:
enum EngineType
{
    ENGINE_CLASSIC=1, //!< Force use the old dnn engine similar to 4.x branch
    ENGINE_NEW=2,     //!< Force use the new dnn engine. The engine does not support non CPU back-ends for now.
    ENGINE_AUTO=3,    //!< Try to use the new engine and then fall back to the classic version.
    ENGINE_ORT=4      //!< Try to use ONNX Runtime wrapper (ONNX only, requires build with WITH_ONNXRUNTIME=ON).
};
The default is ENGINE_AUTO, which tries the new engine first. A YOLO11 ONNX graph loads perfectly well on the new engine, so ENGINE_AUTO succeeds, the classic engine is never reached, and your subsequent call to setPreferableBackend(DNN_BACKEND_CUDA) has nowhere to go. The model runs. The results are correct. It is just running entirely on your CPU.
OpenCV 5.0.0 does say so, during loading rather than at inference time:
[ WARN:0@0.100] global net_impl_backend.cpp:297 setPreferableBackend Back-ends are not supported by the new graph engine for now
[ WARN:0@0.100] global net_impl_backend.cpp:345 setPreferableTarget Targets are not supported by the new graph engine for now
Two lines, printed once, before your application has produced any output worth reading. In a robot’s log they are gone in a second. Here is what they cost, measured on an RTX 3060 Laptop with YOLO11n at 640x640:
| Engine and backend | ms per forward()
|
|---|---|
ENGINE_AUTO + DNN_BACKEND_CUDA
|
55.2 |
ENGINE_CLASSIC + CPU, for reference |
54.3 |
ENGINE_CLASSIC + DNN_BACKEND_CUDA
|
16.3 |
Asking ENGINE_AUTO for CUDA lands within 2% of the plain CPU path. The GPU is idle.
This is the single most common reason “OpenCV 5 is slower than OpenCV 4” reports appear. Nothing is broken; the backend request simply had nowhere to go.
The fix is one argument:
# Python, OpenCV 5
net = cv2.dnn.readNetFromONNX("yolo11s.onnx", cv2.dnn.ENGINE_CLASSIC)
// C++, OpenCV 5
cv::dnn::Net net = cv::dnn::readNetFromONNX("yolo11s.onnx", cv::dnn::ENGINE_CLASSIC);
On OpenCV 4.x there is no engine parameter at all; there is only one engine, and it supports CUDA. So portable code has to branch on the version. Both examples later in this tutorial do exactly that.
ENGINE_CLASSICis where CUDA lives. Note also that the enum is already being reshuffled on the development branch, so treatENGINE_CLASSICas correct for 5.0.x and re-check when you move to a newer release.
Building OpenCV with the CUDA DNN backend
The pip wheels and the distribution packages (libopencv-dev, JetPack’s bundled OpenCV) are all built without OPENCV_DNN_CUDA. There is no shortcut here; you have to build.
What follows is the short version, enough to get you a working build. For the full walkthrough, including the driver and cuDNN installation, the NumPy 2 trap on Ubuntu 24.04, a private install prefix that does not fight with ROS 2, and a five-step verification ladder, see Installing OpenCV 5 with CUDA and DNN Support on Ubuntu 24.04.
The DNN CUDA backend also needs the cudev module, which lives in opencv_contrib, so you need both repositories:
export OPENCV_VERSION=4.12.0   # or 5.0.0

git clone --depth 1 --branch ${OPENCV_VERSION} https://github.com/opencv/opencv.git
git clone --depth 1 --branch ${OPENCV_VERSION} https://github.com/opencv/opencv_contrib.git
Configure. Replace CUDA_ARCH_BIN with your GPU’s compute capability. Use 8.6 for an RTX 30-series, 8.9 for an RTX 40-series, 12.0 for an RTX 50-series, 8.7 for a Jetson™ Orin, 11.0 for a Jetson™ Thor. The CUDA Compute Capability tutorial has the full table and shows you how to query it:
cmake -S opencv -B build \
  -D CMAKE_BUILD_TYPE=Release \
  -D CMAKE_INSTALL_PREFIX=/usr/local \
  -D OPENCV_EXTRA_MODULES_PATH=$(pwd)/opencv_contrib/modules \
  -D WITH_CUDA=ON \
  -D WITH_CUDNN=ON \
  -D OPENCV_DNN_CUDA=ON \
  -D WITH_CUBLAS=ON \
  -D CUDA_ARCH_BIN=8.6 \
  -D CUDA_FAST_MATH=ON \
  -D ENABLE_FAST_MATH=ON \
  -D BUILD_opencv_python3=ON \
  -D OPENCV_GENERATE_PKGCONFIG=ON \
  -D BUILD_TESTS=OFF \
  -D BUILD_PERF_TESTS=OFF \
  -D BUILD_EXAMPLES=OFF
The four flags that matter, and what happens if you miss one:
| Flag | If missing |
|---|---|
WITH_CUDA=ON |
No CUDA anywhere in OpenCV. |
WITH_CUDNN=ON |
CUDA modules build, but the DNN CUDA backend does not. This is the one people miss. |
OPENCV_DNN_CUDA=ON |
DNN_BACKEND_CUDA is not registered; requesting it prints a warning and falls back to CPU. |
CUDA_ARCH_BIN=<your cc> |
Builds for every architecture; hours of compilation and a multi-gigabyte binary. |
Before building, read the CMake summary. It tells you the truth:
--   NVIDIA CUDA:                   YES (ver 12.6, CUFFT CUBLAS FAST_MATH)
--     NVIDIA GPU arch:             86
--     NVIDIA PTX archs:
--
--   cuDNN:                         YES (ver 9.6.0)
If cuDNN says NO, stop. Building anyway produces an OpenCV that cannot do GPU inference, and you will spend the next hour debugging your Python instead.
Then build and install:
cmake --build build -j$(nproc)
sudo cmake --install build
sudo ldconfig
Verifying that CUDA is really being used
Three checks, in increasing order of trustworthiness.
1. Is CUDA compiled in at all?
python3 -c "import cv2; print(cv2.getBuildInformation())" | grep -A 8 "NVIDIA CUDA"
2. Does OpenCV see a device at runtime?
import cv2
print(cv2.__version__)
print("CUDA devices:", cv2.cuda.getCudaEnabledDeviceCount())
A 0 here means the driver is not visible to OpenCV, even if the build was correct.
3. Does the DNN module have a CUDA target registered?
This is the only check that actually matters, and it is the one to automate, because it answers the question directly rather than by inference:
import cv2

# The OpenCV 5 bindings return a NumPy array here, not a list, so convert it
# before testing it: `if not targets` on a multi-element array raises.
targets = list(cv2.dnn.getAvailableTargets(cv2.dnn.DNN_BACKEND_CUDA))

names = {cv2.dnn.DNN_TARGET_CUDA: "CUDA (FP32)",
         cv2.dnn.DNN_TARGET_CUDA_FP16: "CUDA (FP16)"}
print([names.get(int(t), int(t)) for t in targets]
      or "NO CUDA TARGETS: this build cannot do GPU inference")
On a correct build you get:
['CUDA (FP32)', 'CUDA (FP16)']
An empty list is unambiguous: either the CUDA kernels are not in the binary, or no compatible device was found. Nothing else needs interpreting.
The reason to prefer this over the first two checks is that it cannot be fooled. Inside the DNN module, HAVE_CUDA is undefined unless CV_CUDA4DNN was set, which happens only when CUDA, cuBLAS and cuDNN were all found and OPENCV_DNN_CUDA=ON; the backend registry then only registers a target after confirming a compatible device at run time. Check 1 tells you about WITH_CUDA, which can be YES with no DNN CUDA support at all, and check 2 covers the cv::cuda modules rather than cv::dnn.
The failure also shows up on stderr at the first forward(), if you happen to be watching:
[ WARN:0@0.123] global net_impl.cpp:234 setUpNet DNN module was not built with CUDA backend; switching to CPU
The line number moves between releases. That warning is easy to miss in a busy log, and once it has been printed the network runs on the CPU forever without complaining again. The example scripts below re-print it as a loud banner precisely because of this.
CUDA backend will fallback to the CPU implementation for the layer <name>. That one means the backend is active but a particular operator has no CUDA implementation, so that layer round-trips to the host. A handful of these at the very end of the graph is normal. Dozens of them scattered through the middle means your export used an opset with operators the backend does not know, and you should re-export withopset=12.
Part 3: The pipeline, step by step
Before any code, here is the whole journey a single frame takes. Click the diagram to enlarge it:
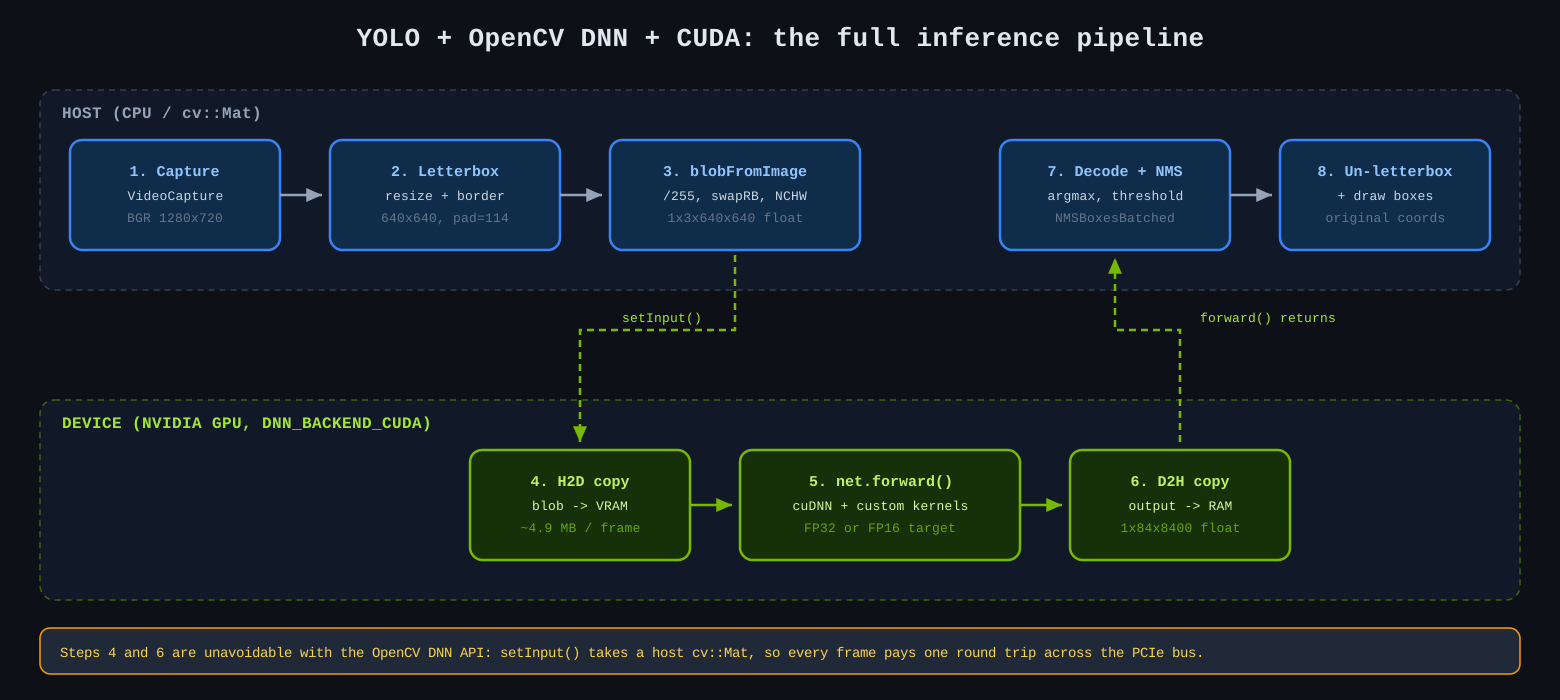
setInput() takes a host Mat, so every frame crosses the PCIe bus twice.
Five of those eight steps are yours to write. Let us go through the three that are easy to get subtly wrong.
Step 2: Letterbox, not resize
YOLO wants a square 640x640 input. Your camera gives you 1280x720. The tempting one-liner is:
resized = cv2.resize(frame, (640, 640)) # DON'T
This squashes a 16:9 frame into a square. Every person becomes short and wide, every bottle becomes a stubby cylinder, shapes the network has never seen in training. Accuracy drops noticeably, and it drops most on the classes with distinctive aspect ratios, which is to say most of the useful ones.
The correct operation is a letterbox: scale by a single factor that fits the longest side, then pad the remainder with a constant colour.
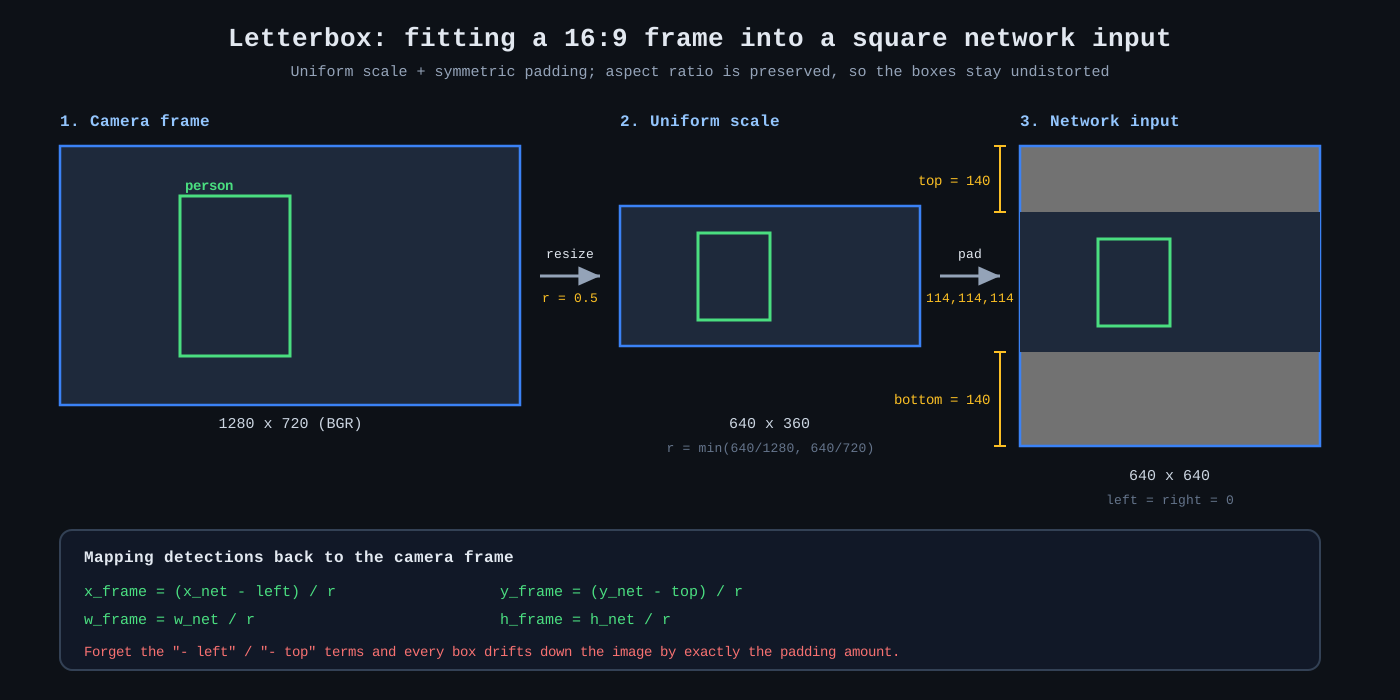
The padding value is 114 (a mid-grey) purely by convention; it is what the YOLO training pipeline uses, so the network has seen a lot of it and has learned to ignore it. Padding with black would work, but slightly worse.
The important part is that the letterbox is invertible, and you must invert it. A detection at (x_net, y_net) in the 640x640 input maps back to the original frame as:
x_frame = (x_net - pad_left) / ratio
y_frame = (y_net - pad_top)  / ratio
w_frame = w_net / ratio
h_frame = h_net / ratio
Forget the pad_left / pad_top subtraction and every box in the example above lands 280 pixels too low. This is, by a wide margin, the most common bug in hand-written YOLO post-processing, and it is insidious, because on a square input image the padding is zero and everything looks perfect.
Step 3: Building the blob
cv2.dnn.blobFromImage() does four things in one call: it converts to float, scales, optionally swaps the red and blue channels, and reorders the memory from HWC (OpenCV’s interleaved layout) to NCHW (what the network expects).
blob = cv2.dnn.blobFromImage(padded,
                             scalefactor=1 / 255.0,
                             size=(640, 640),
                             mean=(0, 0, 0),
                             swapRB=True,
                             crop=False)
Two parameters carry all the risk:
-
scalefactor=1/255.0matters because YOLO expects inputs in[0, 1]. Forget this and you feed values up to 255 into a network trained on unit-range data; you will get essentially random detections rather than an obvious crash. -
swapRB=Truematters because OpenCV reads images as BGR while YOLO was trained on RGB. Get this backwards and detection still works, just noticeably worse, in a way that is very hard to attribute. Red objects suffer most.
mean stays at zero: YOLO does not use per-channel mean subtraction, unlike many classification networks.
blobFromImageWithParams()with anImage2BlobParamsstruct that can perform the letterbox for you (paddingmode=DNN_PMODE_LETTERBOX). It is convenient, but it hides the padding offsets you need for the inverse mapping. Doing it by hand, as below, keepsratio,pad_leftandpad_topin your own variables where you can use them.
Steps 5 to 7: Reading the output tensor
net.forward() returns a single Mat of shape 1 x 84 x 8400. This is where most people’s first attempt goes wrong, because the intuitive reading of that shape is exactly backwards.
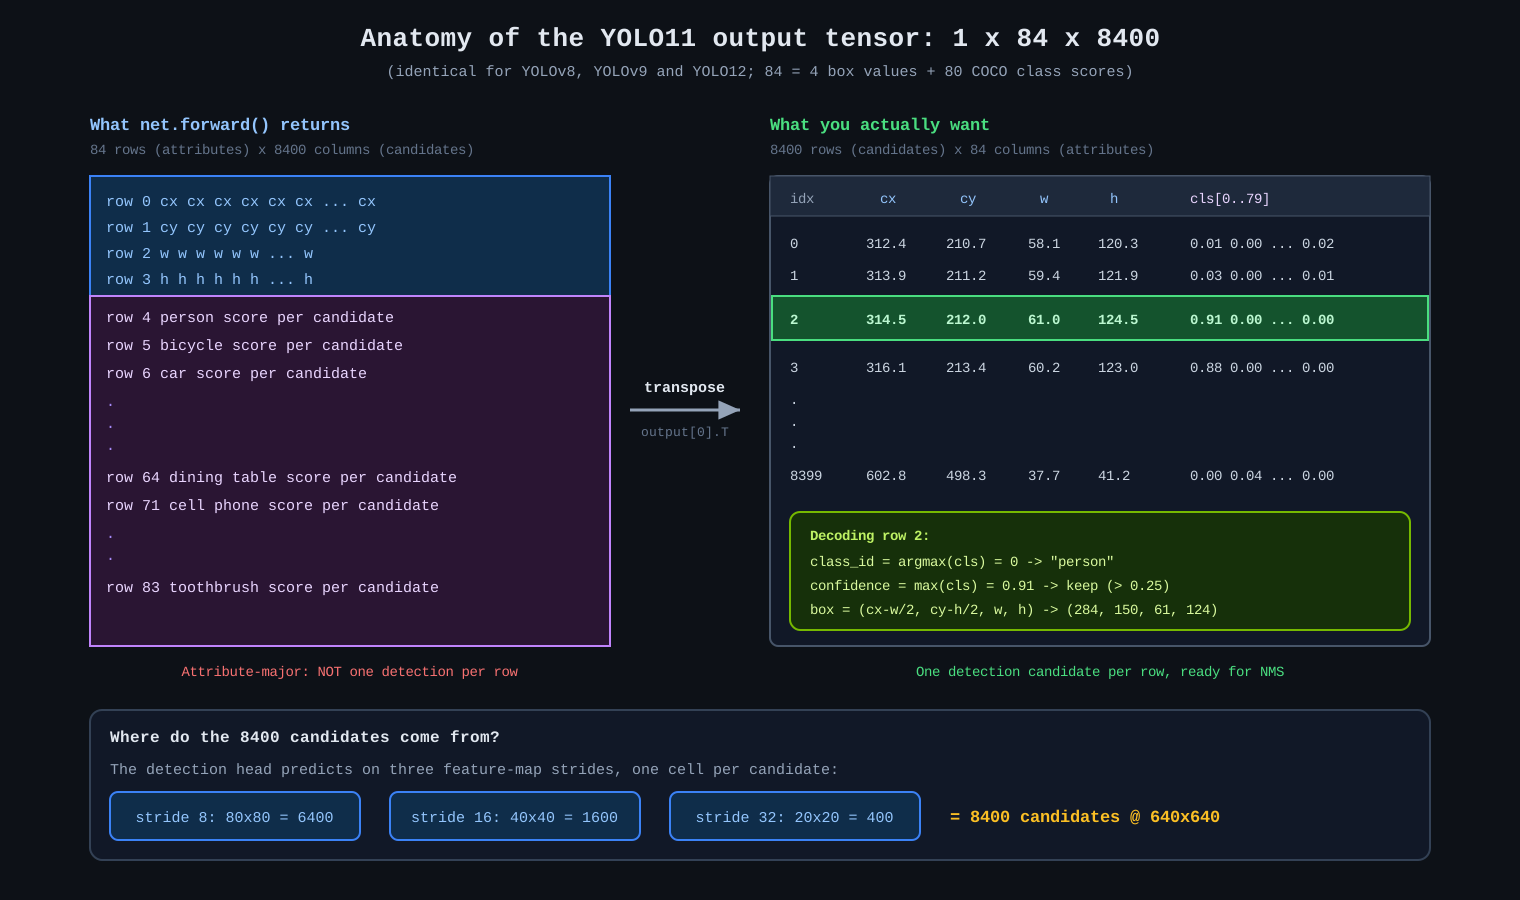
Reading the shape from the right:
-
8400 is the number of candidate detections. It comes from the three detection heads:
80x80 + 40x40 + 20x20 = 6400 + 1600 + 400 = 8400. Every cell of every feature map proposes one box. There are no anchor boxes in modern YOLO; the head is anchor-free. -
84 is
4 + 80: four box values (cx,cy,w,h, in letterboxed 640x640 pixel units, centre-based) followed by one score per COCO class.
And here is the detail that trips everyone up: there is no objectness column. YOLOv5 and earlier emitted 4 + 1 + 80 = 85 values per candidate, where the extra 1 was an “is there anything here at all” score that you multiplied into the class score. YOLOv8 and later dropped it; the class score is the confidence.
So the decode for one candidate is:
class_id = argmax(row[4:])confidence = row[class_id + 4]- Discard if
confidence < threshold; this typically kills more than 99% of the 8400 candidates -
box = (cx - w/2, cy - h/2, w, h), centre-based to corner-based - Map back through the letterbox
Step 7: Non-maximum suppression
The network happily proposes six overlapping boxes for the same dog. NMS keeps the most confident one and discards anything overlapping it beyond an IoU threshold.
OpenCV gives you two functions:
-
cv2.dnn.NMSBoxes(boxes, scores, score_threshold, nms_threshold)is class-agnostic. Apersonbox overlapping abicyclebox will suppress one of them. -
cv2.dnn.NMSBoxesBatched(boxes, scores, class_ids, score_threshold, nms_threshold)runs per class. Boxes only compete against boxes of the same class.
Use NMSBoxesBatched. In everyday scenes objects genuinely overlap; a person sits on a bicycle, a cup sits on a dining table, a cat sits on a couch. Class-agnostic NMS will delete exactly the detections you cared about.
A sensible starting point is score_threshold=0.25, nms_threshold=0.45. Raise the score threshold if you get false positives; raise the NMS threshold if genuinely distinct, closely-packed objects (a shelf of bottles) are being merged.
Part 4: The complete Python detector
Here is the whole thing. Save it as yolo_coco_detect.py; it has no dependencies beyond OpenCV and NumPy.
You can also grab it straight from the companion repository:
python/yolo_coco_detect.py.
#!/usr/bin/env python3
"""Real-time COCO object detection with YOLO, OpenCV DNN and CUDA.

    python3 yolo_coco_detect.py --model yolo11s.onnx --source 0
    python3 yolo_coco_detect.py --model yolo11s.onnx --source desk.mp4 --classes person,cup,laptop
"""

import argparse
import os
import sys
import time

import cv2
import numpy as np

# COCO class names, in the exact order the network scores them.
COCO_CLASSES = (
    "person", "bicycle", "car", "motorcycle", "airplane", "bus", "train", "truck",
    "boat", "traffic light", "fire hydrant", "stop sign", "parking meter", "bench",
    "bird", "cat", "dog", "horse", "sheep", "cow", "elephant", "bear", "zebra",
    "giraffe", "backpack", "umbrella", "handbag", "tie", "suitcase", "frisbee",
    "skis", "snowboard", "sports ball", "kite", "baseball bat", "baseball glove",
    "skateboard", "surfboard", "tennis racket", "bottle", "wine glass", "cup",
    "fork", "knife", "spoon", "bowl", "banana", "apple", "sandwich", "orange",
    "broccoli", "carrot", "hot dog", "pizza", "donut", "cake", "chair", "couch",
    "potted plant", "bed", "dining table", "toilet", "tv", "laptop", "mouse",
    "remote", "keyboard", "cell phone", "microwave", "oven", "toaster", "sink",
    "refrigerator", "book", "clock", "vase", "scissors", "teddy bear",
    "hair drier", "toothbrush",
)

INPUT_SIZE = 640
PAD_VALUE = 114

def _class_color(class_id):
    """Deterministic, well-separated colours via a golden-ratio walk around the
    hue circle. Same formula as the C++ version, so both draw identical boxes."""
    hue = int((class_id * 0.61803398875 * 180.0) % 180.0)
    bgr = cv2.cvtColor(np.uint8([[[hue, 200, 255]]]), cv2.COLOR_HSV2BGR)[0][0]
    return int(bgr[0]), int(bgr[1]), int(bgr[2])


COLORS = [_class_color(i) for i in range(len(COCO_CLASSES))]


def cuda_device_available():
    """True if this OpenCV build can see at least one CUDA device."""
    try:
        return cv2.cuda.getCudaEnabledDeviceCount() > 0
    except (AttributeError, cv2.error):
        return False


def build_network(model_path, use_cuda, fp16):
    """Load the ONNX graph and pin it to the requested backend."""
    if not os.path.isfile(model_path):
        sys.exit(f"Model file not found: {model_path}")

    if hasattr(cv2.dnn, "ENGINE_CLASSIC"):
        # OpenCV 5: ENGINE_AUTO resolves to the new engine, which is CPU-only.
        # ENGINE_CLASSIC is the one that owns the CUDA backend.
        net = cv2.dnn.readNetFromONNX(model_path, cv2.dnn.ENGINE_CLASSIC)
    else:
        # OpenCV 4.x: a single engine, no parameter to pass.
        net = cv2.dnn.readNetFromONNX(model_path)

    if use_cuda:
        net.setPreferableBackend(cv2.dnn.DNN_BACKEND_CUDA)
        net.setPreferableTarget(
            cv2.dnn.DNN_TARGET_CUDA_FP16 if fp16 else cv2.dnn.DNN_TARGET_CUDA
        )
    else:
        net.setPreferableBackend(cv2.dnn.DNN_BACKEND_OPENCV)
        net.setPreferableTarget(cv2.dnn.DNN_TARGET_CPU)

    return net


def letterbox(image):
    """Scale to fit INPUT_SIZE without distortion, then pad the remainder.

    Returns the padded image plus everything needed to invert the transform.
    """
    height, width = image.shape[:2]
    ratio = min(INPUT_SIZE / height, INPUT_SIZE / width)
    new_w = min(INPUT_SIZE, round(width * ratio))
    new_h = min(INPUT_SIZE, round(height * ratio))

    resized = cv2.resize(image, (new_w, new_h), interpolation=cv2.INTER_LINEAR)

    pad_w, pad_h = INPUT_SIZE - new_w, INPUT_SIZE - new_h
    left, top = pad_w // 2, pad_h // 2
    padded = cv2.copyMakeBorder(resized, top, pad_h - top, left, pad_w - left,
                                cv2.BORDER_CONSTANT, value=(PAD_VALUE,) * 3)
    return padded, ratio, left, top


def postprocess(output, ratio, pad_left, pad_top, frame_shape,
                conf_threshold, nms_threshold, keep_ids=None):
    """Turn the raw 1x84x8400 tensor into a list of detections."""
    # (84, 8400) -> (8400, 84): one candidate per row.
    predictions = np.squeeze(output).T

    class_scores = predictions[:, 4:]
    class_ids = np.argmax(class_scores, axis=1)
    confidences = class_scores[np.arange(class_scores.shape[0]), class_ids]

    keep = confidences >= conf_threshold
    if keep_ids is not None:
        keep &= np.isin(class_ids, keep_ids)
    if not np.any(keep):
        return []

    class_ids = class_ids[keep]
    confidences = confidences[keep]
    cx, cy, w, h = predictions[keep, :4].T

    # Undo the letterbox: network pixels -> frame pixels.
    x = (cx - w * 0.5 - pad_left) / ratio
    y = (cy - h * 0.5 - pad_top) / ratio
    w = w / ratio
    h = h / ratio

    # Clip, so a half-visible object does not draw outside the frame.
    frame_h, frame_w = frame_shape[:2]
    x2 = np.clip(x + w, 0, frame_w)
    y2 = np.clip(y + h, 0, frame_h)
    x = np.clip(x, 0, frame_w)
    y = np.clip(y, 0, frame_h)
    boxes = np.stack((x, y, x2 - x, y2 - y), axis=1)

    # Per-class NMS: a person and the bicycle they are on must not suppress
    # each other.
    indices = cv2.dnn.NMSBoxesBatched(
        boxes.tolist(), confidences.tolist(), class_ids.tolist(),
        conf_threshold, nms_threshold,
    )
    if len(indices) == 0:
        return []

    detections = []
    for i in np.asarray(indices).flatten():
        bx, by, bw, bh = boxes[i]
        detections.append({
            "class_id": int(class_ids[i]),
            "label": COCO_CLASSES[class_ids[i]],
            "confidence": float(confidences[i]),
            # round(), not int(): matches cvRound() in the C++ version and
            # Ultralytics itself. Truncating biases every box toward the origin.
            "box": (round(bx), round(by), round(bw), round(bh)),
        })
    return detections


def draw(frame, detections):
    """Draw boxes and labels in place."""
    for det in detections:
        x, y, w, h = det["box"]
        color = COLORS[det["class_id"]]
        label = f'{det["label"]} {det["confidence"]:.2f}'

        cv2.rectangle(frame, (x, y), (x + w, y + h), color, 2)

        (tw, th), baseline = cv2.getTextSize(label, cv2.FONT_HERSHEY_SIMPLEX, 0.5, 1)
        top = max(y, th + 4)
        cv2.rectangle(frame, (x, top - th - 4), (x + tw + 4, top + baseline - 2),
                      color, cv2.FILLED)
        cv2.putText(frame, label, (x + 2, top - 2),
                    cv2.FONT_HERSHEY_SIMPLEX, 0.5, (0, 0, 0), 1, cv2.LINE_AA)


def parse_class_filter(spec):
    """'person,cell_phone' -> array of class indices, or None for 'everything'."""
    if not spec:
        return None
    ids = []
    for raw in spec.split(","):
        name = raw.strip().lower().replace("_", " ")
        if name not in COCO_CLASSES:
            sys.exit(f"Unknown COCO class: '{name}'")
        ids.append(COCO_CLASSES.index(name))
    return np.array(ids)


def main():
    parser = argparse.ArgumentParser(
        description=__doc__, formatter_class=argparse.RawDescriptionHelpFormatter)
    parser.add_argument("--model", required=True, help="path to the YOLO .onnx file")
    parser.add_argument("--source", default="0",
                        help="camera index, video file or stream URL (default: 0)")
    parser.add_argument("--conf", type=float, default=0.25, help="confidence threshold")
    parser.add_argument("--nms", type=float, default=0.45, help="NMS IoU threshold")
    parser.add_argument("--classes", default="",
                        help="comma-separated COCO classes to keep, e.g. person,cup,laptop")
    parser.add_argument("--cpu", action="store_true", help="force CPU inference")
    parser.add_argument("--fp16", action="store_true",
                        help="use the CUDA FP16 target (compute capability >= 5.3)")
    args = parser.parse_args()

    use_cuda = not args.cpu and cuda_device_available()
    if not args.cpu and not use_cuda:
        print("!" * 72)
        print("! No CUDA device visible to OpenCV - inference will run on the CPU.")
        print("! Check cv2.getBuildInformation() for 'NVIDIA CUDA: YES'.")
        print("!" * 72)

    net = build_network(args.model, use_cuda, args.fp16)
    keep_ids = parse_class_filter(args.classes)

    source = int(args.source) if args.source.isdigit() else args.source
    cap = cv2.VideoCapture(source)
    if not cap.isOpened():
        sys.exit(f"Cannot open source: {args.source}")

    # Warm-up. The first forward() on the CUDA backend also runs cuDNN's
    # algorithm selection and can take seconds. Never benchmark that one.
    print("Warming up...")
    net.setInput(np.zeros((1, 3, INPUT_SIZE, INPUT_SIZE), dtype=np.float32))
    net.forward()
    target = "GPU" + (" (FP16)" if args.fp16 else "") if use_cuda else "CPU"
    print(f"Ready - inference on {target}. Press 'q' to quit.")

    fps = 0.0
    while True:
        ok, frame = cap.read()
        if not ok:
            break
        loop_start = time.perf_counter()

        padded, ratio, pad_left, pad_top = letterbox(frame)
        blob = cv2.dnn.blobFromImage(padded, scalefactor=1 / 255.0,
                                     size=(INPUT_SIZE, INPUT_SIZE),
                                     swapRB=True, crop=False)
        net.setInput(blob)
        output = net.forward()

        detections = postprocess(output, ratio, pad_left, pad_top, frame.shape,
                                 args.conf, args.nms, keep_ids)
        draw(frame, detections)

        # Exponential moving average, so the number stays readable.
        instant = 1.0 / max(time.perf_counter() - loop_start, 1e-6)
        fps = instant if fps == 0.0 else 0.9 * fps + 0.1 * instant
        inference_ms = net.getPerfProfile()[0] / cv2.getTickFrequency() * 1000.0

        cv2.putText(frame,
                    f"{fps:5.1f} FPS | inference {inference_ms:5.1f} ms | "
                    f"{len(detections)} objects",
                    (10, 28), cv2.FONT_HERSHEY_SIMPLEX, 0.7,
                    (0, 255, 0), 2, cv2.LINE_AA)

        cv2.imshow("YOLO + OpenCV DNN", frame)
        if cv2.waitKey(1) & 0xFF in (ord("q"), 27):
            break

    cap.release()
    cv2.destroyAllWindows()


if __name__ == "__main__":
    main()
Running it
# Everything, from the default webcam
python3 yolo_coco_detect.py --model yolo11s.onnx --source 0

# Only the things on your desk, from a recorded clip
python3 yolo_coco_detect.py --model yolo11s.onnx --source desk.mp4 \
    --classes person,cup,laptop,cell_phone,book,mouse,keyboard

# Half precision, for roughly a 1.5-2x speed-up on Turing and newer
python3 yolo_coco_detect.py --model yolo11s.onnx --fp16

# Force CPU, to see what the GPU is buying you
python3 yolo_coco_detect.py --model yolo11s.onnx --cpu
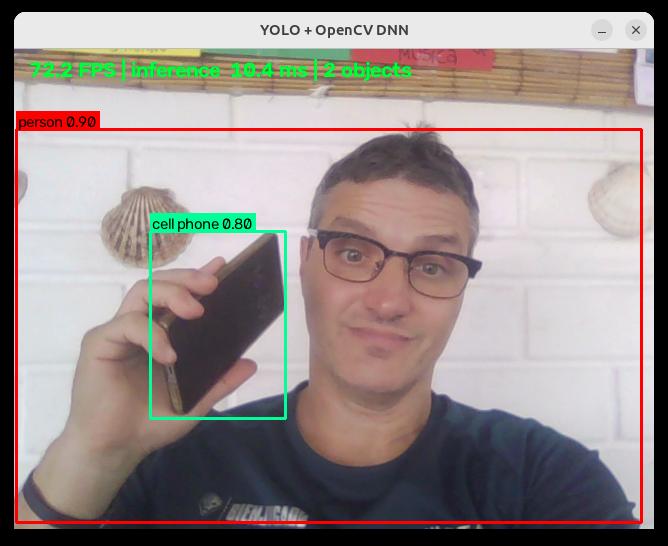
Run those last two back to back. The difference between the inference figures in the overlay is the entire point of this tutorial.
--classesfilters after inference, not before; the network still scores all 80 classes, because there is no way to make it do less work. What filtering buys you is a much cleaner NMS stage and a display that is not covered inchairboxes.
Part 5: The same detector in C++
For anything embedded, or anything that has to live inside a ROS 2 node, you want the C++ version. It is the same eight steps; only the syntax changes.
Both files are in the companion repository:
cpp/yolo_coco_detect.cpp and
cpp/CMakeLists.txt.
yolo_coco_detect.cpp
// Real-time COCO object detection with YOLO, OpenCV DNN and CUDA.
//
//   ./yolo_coco_detect yolo11s.onnx 0
//   ./yolo_coco_detect yolo11s.onnx desk.mp4 --fp16

#include <opencv2/core.hpp>
#include <opencv2/core/cuda.hpp>
#include <opencv2/dnn.hpp>
#include <opencv2/highgui.hpp>
#include <opencv2/imgproc.hpp>
#include <opencv2/videoio.hpp>

#include <algorithm>
#include <cctype>
#include <cmath>
#include <iostream>
#include <string>
#include <vector>

namespace
{

constexpr int   kInputSize     = 640;
constexpr float kPadValue      = 114.0F;
constexpr float kConfThreshold = 0.25F;
constexpr float kNmsThreshold  = 0.45F;

// COCO class names, in the exact order the network scores them.
const std::vector<std::string> kCocoClasses = {
    "person", "bicycle", "car", "motorcycle", "airplane", "bus", "train", "truck",
    "boat", "traffic light", "fire hydrant", "stop sign", "parking meter", "bench",
    "bird", "cat", "dog", "horse", "sheep", "cow", "elephant", "bear", "zebra",
    "giraffe", "backpack", "umbrella", "handbag", "tie", "suitcase", "frisbee",
    "skis", "snowboard", "sports ball", "kite", "baseball bat", "baseball glove",
    "skateboard", "surfboard", "tennis racket", "bottle", "wine glass", "cup",
    "fork", "knife", "spoon", "bowl", "banana", "apple", "sandwich", "orange",
    "broccoli", "carrot", "hot dog", "pizza", "donut", "cake", "chair", "couch",
    "potted plant", "bed", "dining table", "toilet", "tv", "laptop", "mouse",
    "remote", "keyboard", "cell phone", "microwave", "oven", "toaster", "sink",
    "refrigerator", "book", "clock", "vase", "scissors", "teddy bear",
    "hair drier", "toothbrush"};

struct Detection
{
    int      classId    = 0;
    float    confidence = 0.0F;
    cv::Rect box;
};

/// Everything needed to invert the letterbox transform.
struct LetterboxInfo
{
    float ratio   = 1.0F;
    int   padLeft = 0;
    int   padTop  = 0;
};

LetterboxInfo letterbox(const cv::Mat& src, cv::Mat& dst)
{
    LetterboxInfo info;
    info.ratio = std::min(static_cast<float>(kInputSize) / static_cast<float>(src.rows),
                          static_cast<float>(kInputSize) / static_cast<float>(src.cols));

    const int newW = std::min<int>(kInputSize, static_cast<int>(std::lround(src.cols * info.ratio)));
    const int newH = std::min<int>(kInputSize, static_cast<int>(std::lround(src.rows * info.ratio)));

    cv::Mat resized;
    cv::resize(src, resized, cv::Size(newW, newH), 0, 0, cv::INTER_LINEAR);

    const int padW = kInputSize - newW;
    const int padH = kInputSize - newH;
    info.padLeft   = padW / 2;
    info.padTop    = padH / 2;

    cv::copyMakeBorder(resized, dst,
                       info.padTop, padH - info.padTop,
                       info.padLeft, padW - info.padLeft,
                       cv::BORDER_CONSTANT, cv::Scalar::all(kPadValue));
    return info;
}

cv::dnn::Net createNetwork(const std::string& modelPath, bool useCuda, bool fp16)
{
#if CV_VERSION_MAJOR >= 5
    // OpenCV 5: ENGINE_AUTO resolves to the new engine, which is CPU-only.
    // ENGINE_CLASSIC is the one that owns the CUDA backend.
    cv::dnn::Net net = cv::dnn::readNetFromONNX(modelPath, cv::dnn::ENGINE_CLASSIC);
#else
    // OpenCV 4.x: a single engine, no parameter to pass.
    cv::dnn::Net net = cv::dnn::readNetFromONNX(modelPath);
#endif

    if (useCuda)
    {
        net.setPreferableBackend(cv::dnn::DNN_BACKEND_CUDA);
        net.setPreferableTarget(fp16 ? cv::dnn::DNN_TARGET_CUDA_FP16
                                     : cv::dnn::DNN_TARGET_CUDA);
    }
    else
    {
        net.setPreferableBackend(cv::dnn::DNN_BACKEND_OPENCV);
        net.setPreferableTarget(cv::dnn::DNN_TARGET_CPU);
    }
    return net;
}

std::vector<Detection> postprocess(const cv::Mat& output,
                                   const LetterboxInfo& info,
                                   const cv::Size& frameSize)
{
    CV_Assert(output.dims == 3);

    const int numClasses = static_cast<int>(kCocoClasses.size());
    const int attributes = output.size[1];   // 84 = 4 + numClasses
    const int candidates = output.size[2];   // 8400
    CV_Assert(attributes == 4 + numClasses);

    // Wrap the tensor as a 2-D matrix without copying, then transpose so that
    // every row is one candidate detection.
    const cv::Mat raw(attributes, candidates, CV_32F,
                      const_cast<float*>(output.ptr<float>()));
    cv::Mat preds;
    cv::transpose(raw, preds);               // candidates x attributes

    std::vector<cv::Rect> boxes;
    std::vector<float>    confidences;
    std::vector<int>      classIds;

    const cv::Rect frameRect(0, 0, frameSize.width, frameSize.height);

    for (int i = 0; i < preds.rows; ++i)
    {
        const float* row = preds.ptr<float>(i);

        // No objectness column in YOLOv8 and later: the class score IS the
        // confidence.
        const cv::Mat scores(1, numClasses, CV_32F, const_cast<float*>(row + 4));
        cv::Point classIdPoint;
        double    confidence = 0.0;
        cv::minMaxLoc(scores, nullptr, &confidence, nullptr, &classIdPoint);

        if (confidence < static_cast<double>(kConfThreshold))
        {
            continue;
        }

        // Centre-based letterboxed pixels -> corner-based frame pixels.
        const float cx = row[0];
        const float cy = row[1];
        const float w  = row[2];
        const float h  = row[3];

        const float left = (cx - w * 0.5F - static_cast<float>(info.padLeft)) / info.ratio;
        const float top  = (cy - h * 0.5F - static_cast<float>(info.padTop)) / info.ratio;

        cv::Rect box(cvRound(left), cvRound(top),
                     cvRound(w / info.ratio), cvRound(h / info.ratio));
        box &= frameRect;                    // clip to the visible frame
        if (box.empty())
        {
            continue;
        }

        boxes.push_back(box);
        confidences.push_back(static_cast<float>(confidence));
        classIds.push_back(classIdPoint.x);
    }

    // Per-class NMS: a person and the bicycle they are on must not suppress
    // each other.
    std::vector<int> keep;
    cv::dnn::NMSBoxesBatched(boxes, confidences, classIds,
                             kConfThreshold, kNmsThreshold, keep);

    std::vector<Detection> detections;
    detections.reserve(keep.size());
    for (const int idx : keep)
    {
        detections.push_back({classIds[idx], confidences[idx], boxes[idx]});
    }
    return detections;
}

/// Deterministic, well-separated colours via a golden-ratio walk around the hue circle.
cv::Scalar classColor(int classId)
{
    const auto hue = static_cast<uchar>(std::fmod(classId * 0.61803398875 * 180.0, 180.0));
    cv::Mat hsv(1, 1, CV_8UC3, cv::Scalar(hue, 200, 255));
    cv::Mat bgr;
    cv::cvtColor(hsv, bgr, cv::COLOR_HSV2BGR);
    const cv::Vec3b& c = bgr.at<cv::Vec3b>(0, 0);
    return cv::Scalar(c[0], c[1], c[2]);
}

void draw(cv::Mat& frame, const std::vector<Detection>& detections)
{
    for (const Detection& det : detections)
    {
        const cv::Scalar color = classColor(det.classId);
        cv::rectangle(frame, det.box, color, 2);

        const std::string label =
            kCocoClasses[det.classId] + cv::format(" %.2f", det.confidence);

        int baseline = 0;
        const cv::Size textSize =
            cv::getTextSize(label, cv::FONT_HERSHEY_SIMPLEX, 0.5, 1, &baseline);
        const int top = std::max(det.box.y, textSize.height + 4);

        cv::rectangle(frame,
                      cv::Point(det.box.x, top - textSize.height - 4),
                      cv::Point(det.box.x + textSize.width + 4, top + baseline - 2),
                      color, cv::FILLED);
        cv::putText(frame, label, cv::Point(det.box.x + 2, top - 2),
                    cv::FONT_HERSHEY_SIMPLEX, 0.5, cv::Scalar(0, 0, 0), 1, cv::LINE_AA);
    }
}

/// Everything the program does. Wrapped by main() so that an OpenCV error
/// (a missing model file, a graph it cannot parse) prints one clear line
/// instead of terminating the process with an uncaught exception.
int runDetector(int argc, char** argv)
{
    const cv::String keys =
        "{help h usage ? |       | print this message }"
        "{@model         |<none> | path to the YOLO .onnx file }"
        "{@source        | 0     | camera index, video file or stream URL }"
        "{cpu            | false | force CPU inference }"
        "{fp16           | false | use the CUDA FP16 target }";

    cv::CommandLineParser parser(argc, argv, keys);
    parser.about("YOLO + OpenCV DNN + CUDA object detection");
    if (parser.has("help"))
    {
        parser.printMessage();
        return 0;
    }

    const std::string modelPath = parser.get<std::string>("@model");
    const std::string source    = parser.get<std::string>("@source");
    const bool        forceCpu  = parser.get<bool>("cpu");
    const bool        fp16      = parser.get<bool>("fp16");
    if (!parser.check())
    {
        parser.printErrors();
        return 1;
    }

    const bool useCuda = !forceCpu && cv::cuda::getCudaEnabledDeviceCount() > 0;
    if (!forceCpu && !useCuda)
    {
        std::cerr << "No CUDA device visible to OpenCV - inference will run on the CPU.\n"
                  << "Check cv::getBuildInformation() for 'NVIDIA CUDA: YES'.\n";
    }

    cv::dnn::Net net = createNetwork(modelPath, useCuda, fp16);

    cv::VideoCapture cap;
    if (source.size() == 1 && std::isdigit(static_cast<unsigned char>(source[0])))
    {
        cap.open(source[0] - '0');
    }
    else
    {
        cap.open(source);
    }

    if (!cap.isOpened())
    {
        std::cerr << "Cannot open source: " << source << '\n';
        return 1;
    }

    // Warm-up: the first forward() on the CUDA backend also runs cuDNN's
    // algorithm selection and can take seconds. Never benchmark that one.
    std::cout << "Warming up..." << std::endl;
    const int blobShape[4] = {1, 3, kInputSize, kInputSize};
    net.setInput(cv::Mat(4, blobShape, CV_32F, cv::Scalar(0)));
    net.forward();
    std::cout << "Ready - inference on " << (useCuda ? "GPU" : "CPU")
              << (useCuda && fp16 ? " (FP16)" : "") << ". Press 'q' to quit." << std::endl;

    cv::Mat frame;
    cv::Mat padded;
    double  fps = 0.0;

    while (cap.read(frame) && !frame.empty())
    {
        const int64 loopStart = cv::getTickCount();

        const LetterboxInfo info = letterbox(frame, padded);
        const cv::Mat blob = cv::dnn::blobFromImage(padded, 1.0 / 255.0,
                                                    cv::Size(kInputSize, kInputSize),
                                                    cv::Scalar(), /*swapRB=*/true,
                                                    /*crop=*/false);
        net.setInput(blob);
        const cv::Mat output = net.forward();

        const std::vector<Detection> detections = postprocess(output, info, frame.size());
        draw(frame, detections);

        const double elapsed =
            static_cast<double>(cv::getTickCount() - loopStart) / cv::getTickFrequency();
        const double instant = 1.0 / std::max(elapsed, 1e-6);
        fps = (fps == 0.0) ? instant : 0.9 * fps + 0.1 * instant;

        std::vector<double> timings;
        const double inferenceMs =
            static_cast<double>(net.getPerfProfile(timings)) / cv::getTickFrequency() * 1000.0;

        cv::putText(frame,
                    cv::format("%5.1f FPS | inference %5.1f ms | %zu objects",
                               fps, inferenceMs, detections.size()),
                    cv::Point(10, 28), cv::FONT_HERSHEY_SIMPLEX, 0.7,
                    cv::Scalar(0, 255, 0), 2, cv::LINE_AA);

        cv::imshow("YOLO + OpenCV DNN", frame);
        const int key = cv::waitKey(1);
        if (key == 'q' || key == 27)
        {
            break;
        }
    }

    cap.release();
    cv::destroyAllWindows();
    return 0;
}

}  // namespace

int main(int argc, char** argv)
{
    try
    {
        return runDetector(argc, argv);
    }
    catch (const cv::Exception& e)
    {
        std::cerr << "OpenCV error: " << e.what() << '\n';
        return 1;
    }
}
CMakeLists.txt
cmake_minimum_required(VERSION 3.16)
project(yolo_coco_detect LANGUAGES CXX)

set(CMAKE_CXX_STANDARD 17)          # OpenCV 5 requires C++17
set(CMAKE_CXX_STANDARD_REQUIRED ON)

if(NOT CMAKE_BUILD_TYPE)
  set(CMAKE_BUILD_TYPE Release)
endif()

find_package(OpenCV REQUIRED COMPONENTS core dnn highgui imgproc videoio)
message(STATUS "Building against OpenCV ${OpenCV_VERSION} (${OpenCV_DIR})")

add_executable(yolo_coco_detect yolo_coco_detect.cpp)
target_include_directories(yolo_coco_detect PRIVATE ${OpenCV_INCLUDE_DIRS})
target_link_libraries(yolo_coco_detect PRIVATE ${OpenCV_LIBS})
Build and run:
cmake -S . -B build -D CMAKE_BUILD_TYPE=Release
cmake --build build -j$(nproc)
./build/yolo_coco_detect yolo11s.onnx 0
OpenCV_DIRline that CMake prints. If you built a CUDA-enabled OpenCV into/usr/localbut the system also has alibopencv-devpackage in/usr, CMake will often pick the system one, and you will spend an afternoon wondering why your GPU is idle. Pass-D OpenCV_DIR=/usr/local/lib/cmake/opencv4to be certain.
cv::transpose(raw, preds)writes into a differentMaton purpose. In-place transposition of a non-square matrix is not safe, andrawis a header pointing straight into the network’s own output buffer; reallocating it underneath the transpose would corrupt the data mid-read.
Part 6: From detections to something actually useful
A list of boxes is not an application. What you usually want is an answer: how many people are in the room, is the cat on the couch, did someone leave a bag by the door. Two small pieces turn the raw output into that.
Counting what is in the frame
from collections import Counter


def summarize(detections):
    """'2 person, 1 laptop, 1 cup' - the everyday answer."""
    counts = Counter(det["label"] for det in detections)
    return ", ".join(f"{n} {label}" for label, n in counts.most_common())
Debouncing, so a single missed frame is not an event
This is the piece almost everyone skips, and it is the reason naive detectors spam notifications. Detection is noisy at the frame level: an object at an awkward angle will drop below the confidence threshold for two or three frames and come straight back. If you fire an event on every transition, you get a flood.
from collections import deque


class PresenceMonitor:
    """Turn noisy per-frame detections into stable appear/disappear events.

    Presence is declared after `min_hits` detections inside a sliding window of
    `window` frames; absence only after a *full* window with no detection at all.
    The asymmetry is deliberate - appearing should be quick, disappearing slow.
    """

    def __init__(self, window=15, min_hits=8):
        self.window = window
        self.min_hits = min_hits
        self._history = {}
        self._present = {}

    def update(self, detections):
        """Feed one frame, get back (appeared, disappeared) label lists."""
        seen_now = {det["label"] for det in detections}
        for label in seen_now:
            self._history.setdefault(label, deque(maxlen=self.window))

        appeared, disappeared = [], []
        for label, hits in self._history.items():
            hits.append(label in seen_now)
            was_present = self._present.get(label, False)

            if not was_present and sum(hits) >= self.min_hits:
                self._present[label] = True
                appeared.append(label)
            elif was_present and len(hits) == self.window and sum(hits) == 0:
                self._present[label] = False
                disappeared.append(label)

        return appeared, disappeared
At 30 FPS, window=15, min_hits=8 means “seen in at least 8 of the last 15 frames”, roughly half a second of evidence before anything is announced.
Caring about where, not just what
For most everyday questions the position matters more than the class. Use the bottom-centre of the box as the object’s footprint; for anything standing on a surface, that point is where it actually is, while the box centre floats in mid-air:
def in_zone(detection, zone):
    """True when the object's footprint falls inside `zone` = (x, y, w, h)."""
    zx, zy, zw, zh = zone
    x, y, w, h = detection["box"]
    foot_x, foot_y = x + w // 2, y + h
    return zx <= foot_x < zx + zw and zy <= foot_y < zy + zh
Wiring it together
Dropped into the main loop, that is a complete “is there a parcel on my doorstep” detector:
monitor = PresenceMonitor(window=15, min_hits=8)
doorstep = (420, 500, 400, 200)   # x, y, w, h in frame coordinates

# ... inside the loop, right after postprocess() ...
in_area = [d for d in detections if in_zone(d, doorstep)]
appeared, disappeared = monitor.update(in_area)

for label in appeared:
    print(f"[{time.strftime('%H:%M:%S')}] {label} arrived on the doorstep")
    cv2.imwrite(f"snapshot_{label}_{int(time.time())}.jpg", frame)
for label in disappeared:
    print(f"[{time.strftime('%H:%M:%S')}] {label} gone")

cv2.rectangle(frame, doorstep[:2],
              (doorstep[0] + doorstep[2], doorstep[1] + doorstep[3]),
              (255, 255, 0), 1)
cv2.putText(frame, summarize(detections), (10, 56),
            cv2.FONT_HERSHEY_SIMPLEX, 0.6, (255, 255, 255), 1, cv2.LINE_AA)
cv::TrackerCSRT. That is a tutorial of its own.
Part 7: Performance, what to measure and what to change
Always warm up before timing
The first forward() on the CUDA backend is not representative of anything. It allocates device buffers, and cuDNN runs its algorithm-selection heuristics for every convolution in the graph. That first call can take seconds. Both examples above run one dummy inference before entering the loop; do the same in any benchmark you write, and discard the result.
The levers, in the order that pays
| Lever | Typical effect | Cost |
|---|---|---|
DNN_TARGET_CUDA_FP16 |
Usually 15% to 30% faster on Turing and newer; not guaranteed, measure it | A negligible mAP drop for detection; needs compute capability >= 5.3 |
Smaller model (s -> n) |
Roughly proportional to FLOPs | Noticeably more missed small objects |
Smaller input (imgsz=480) |
~1.8x fewer FLOPs than 640 | Small objects degrade fast; you must re-export |
| Skip frames | Linear | Latency on fast-moving objects |
Tighter --conf |
Small (only post-processing) | Free, if your threshold was too loose |
FP16 is the first thing to try, because it is a one-line change and it costs almost nothing in accuracy for detection work. It is not, however, the free win it is often described as. Measuring YOLO11n at 640x640 on an RTX 3060 Laptop, OpenCV 5.0.0 with the classic engine, I got FP16 at 0.67x to 0.85x of the FP32 time across interleaved runs, so a real but moderate gain rather than a transformation.
Measuring properly
getPerfProfile() gives you the time inside forward() only:
inference_ms = net.getPerfProfile()[0] / cv2.getTickFrequency() * 1000.0
Compare that number with your end-to-end loop time. The gap is your pre- and post-processing plus the two PCIe transfers, and on a fast GPU with a small model that gap can easily be larger than the inference itself. If it is, stop optimising the network; optimise the Python.
getPerfProfile(timings)is not always populated, because layers get fused and executed asynchronously. The total is reliable; treat the per-layer numbers with suspicion.
The transfer you cannot avoid
Look again at the pipeline diagram: steps 4 and 6 copy 4.9 MB up and 2.8 MB back, every single frame. The OpenCV DNN API has no way around this; setInput() takes a host cv::Mat, so even if your frame originated on the GPU (from NVDEC, or from a cv::cuda::GpuMat pipeline), it has to come down to host memory and go straight back up.
This is precisely what OpenCV’s planned non-CPU HAL is meant to fix. Until then, if the round trip is what limits you, OpenCV DNN is the wrong tool; see the last section.
Honest expectations
I am deliberately not publishing an FPS table here, because the number depends on your GPU, your CUDA and cuDNN versions, your model scale, your input resolution, and whether your camera can even deliver frames fast enough. Any table I printed would mislead more than it helped.
What I will say is the shape of the answer: on a modern desktop GPU with YOLO11s at 640x640 and the FP16 target, OpenCV DNN comfortably clears real-time for a single stream, and the CPU-versus-GPU difference is not subtle; it is the difference between a slideshow and a video. Run the script twice, once with --cpu and once without, and read your own numbers off the overlay. That comparison is the only benchmark that matters for your setup.
Part 8: Troubleshooting
The failure modes here are unusually deceptive, because most of them produce output that looks almost right.
| Symptom | Cause | Fix |
|---|---|---|
setUpNet DNN module was not built with CUDA backend; switching to CPU |
OpenCV built without OPENCV_DNN_CUDA=ON, or WITH_CUDNN was off |
Rebuild. Check the CMake summary for cuDNN: YES
|
Correct results, no speed-up, on OpenCV 5, with two not supported by the new graph engine warnings while loading |
ENGINE_AUTO selected the new CPU-only engine, so the backend request was dropped |
readNetFromONNX(path, ENGINE_CLASSIC), or OPENCV_FORCE_DNN_ENGINE=1 in the environment to test without touching the code |
(-215:Assertion failed) biasLayerData->outputBlobsWrappers.size() == 1 in function 'fuseLayers' with YOLO11 + CUDA |
Known layer-fusion bug, fixed in OpenCV 4.12.0 | Upgrade to >= 4.12.0. On older builds, net.enableFusion(False) before forward()
|
| Boxes shifted down or right by a constant amount | Padding offsets not subtracted when inverting the letterbox | x = (cx - w/2 - pad_left) / ratio |
| Boxes are the right size but in the wrong place, only on non-square frames | Plain cv2.resize() to 640x640 instead of a letterbox |
Use the letterbox |
| Everything is detected as class 0, or scores look like garbage | Missing transpose, or a YOLOv5-family model with 85 attributes | Check output.shape; transpose to (8400, 84)
|
| Detections are wildly wrong, no error |
scalefactor not set to 1/255
|
Fix blobFromImage()
|
| Detection works but is noticeably worse than the same model in Python/PyTorch |
swapRB=False, the model is seeing BGR |
Set swapRB=True
|
| First frame takes several seconds | cuDNN algorithm selection on the first forward()
|
Expected. Warm up before timing |
| Overlapping objects of different classes disappear | Class-agnostic NMSBoxes
|
Use NMSBoxesBatched
|
Dozens of CUDA backend will fallback to the CPU implementation for the layer ...
|
Export used an opset with operators the CUDA backend lacks | Re-export with opset=12 simplify=True
|
Can't create layer ... of type ... at load time |
Exported with nms=True or dynamic=True
|
Re-export with both off |
| Detections stop at the frame edges | Boxes clipped away because the object is half out of frame | Expected behaviour of the clip; lower the confidence threshold if it matters |
| Build picks the wrong OpenCV | System libopencv-dev shadows your /usr/local build |
-D OpenCV_DIR=/usr/local/lib/cmake/opencv4 |
When to stop using OpenCV DNN
OpenCV DNN is the right tool when you value one dependency over maximum throughput. That is a genuinely good trade for most projects, and it is why this tutorial exists.
It stops being the right tool when:
- You need every last millisecond. TensorRT compiles the graph ahead of time for your exact GPU, with layer fusion and INT8 calibration that OpenCV does not attempt. Expect a substantial margin over the CUDA backend.
-
Your frames already live on the GPU. If you are decoding with NVDEC or running a
cv::cudapipeline, the forced host round trip is pure waste. - You need batching across several cameras. OpenCV DNN can batch, but the ergonomics are poor and the win is smaller than with a dedicated runtime.
-
Your model uses operators the classic engine does not implement. ONNX Runtime with the CUDA execution provider will load almost anything, and OpenCV 5 can even wrap it directly via
ENGINE_ORTwhen built withWITH_ONNXRUNTIME=ON.
For a single camera, an everyday object detector, and a codebase that already links OpenCV, none of those apply, and you have just avoided two gigabytes of dependencies.
Conclusion
The pipeline in this tutorial is short enough to read in one sitting, but every step in it has a way of going subtly wrong: the letterbox that is not inverted, the tensor that is not transposed, the class-agnostic NMS that eats the cup on the table, and, on OpenCV 5, the engine that declines to use your GPU at all and mentions it only in passing.
Get those right and you have a dependency-light, real-time detector for the eighty objects that make up an ordinary day, in Python or C++, on a GPU you already own.
If you build something with it, I would like to hear about it.
Happy detecting!
References
- OpenCV DNN module tutorials
- OpenCV: YOLO DNNs tutorial, the upstream reference, including the list of supported YOLO variants
- OpenCV 5 announcement and my write-up, OpenCV 5 is Finally Here!
- Ultralytics YOLO11 documentation and export arguments
- Ultralytics YOLO26, the NMS-free successor
- YOLOX, an Apache-2.0 alternative, also supported by OpenCV DNN
- COCO dataset
- opencv/opencv#26566, the YOLO11 + CUDA fusion bug, fixed by PR #27326 in OpenCV 4.12.0
- Installing OpenCV 5 with CUDA and DNN Support on Ubuntu 24.04, the full build and verification walkthrough
-
NVIDIA® CUDA™ Compute Capability, for the
CUDA_ARCH_BINvalue you need - Myzhar/tutorial-opencv-yolo, the complete source code for this tutorial