Last update: August 25, 2026. Written against OpenCV 5.0.0 on Ubuntu 24.04.4 LTS, with CUDA™ 12.9 / 13.x and cuDNN 9. Every CMake option and every log message quoted here was checked against the 5.0.0 sources; every apt package name was checked against the live NVIDIA® and Ubuntu repositories on that date.
Introduction
Installing OpenCV is a one-liner. Installing the OpenCV you actually wanted is an afternoon.
The one-liner, pip install opencv-python, gives you a perfectly good library that will never touch your GPU. sudo apt install libopencv-dev gives you OpenCV 4.6.0 on Ubuntu 24.04, which is four years old and also will never touch your GPU. Neither is built with OPENCV_DNN_CUDA, and no combination of runtime flags can change that; the code simply is not in the binary.
So if you want GPU-accelerated deep learning inference from OpenCV, you build from source. That has been true since the DNN CUDA backend appeared in 4.2, and it is still true today.
What is new is that OpenCV 5 made the situation more confusing rather than less. The headline feature of the 5.0 release, which I wrote about in OpenCV 5 is Finally Here!, is a completely rewritten DNN engine with ONNX operator coverage jumping from roughly 23% to over 80%. It is a genuinely excellent piece of engineering, and as of 5.0.x it is CPU-only. GPU inference in OpenCV 5 still goes through the old engine, which means a correct build has to enable the legacy path deliberately, and your application has to ask for it deliberately too.
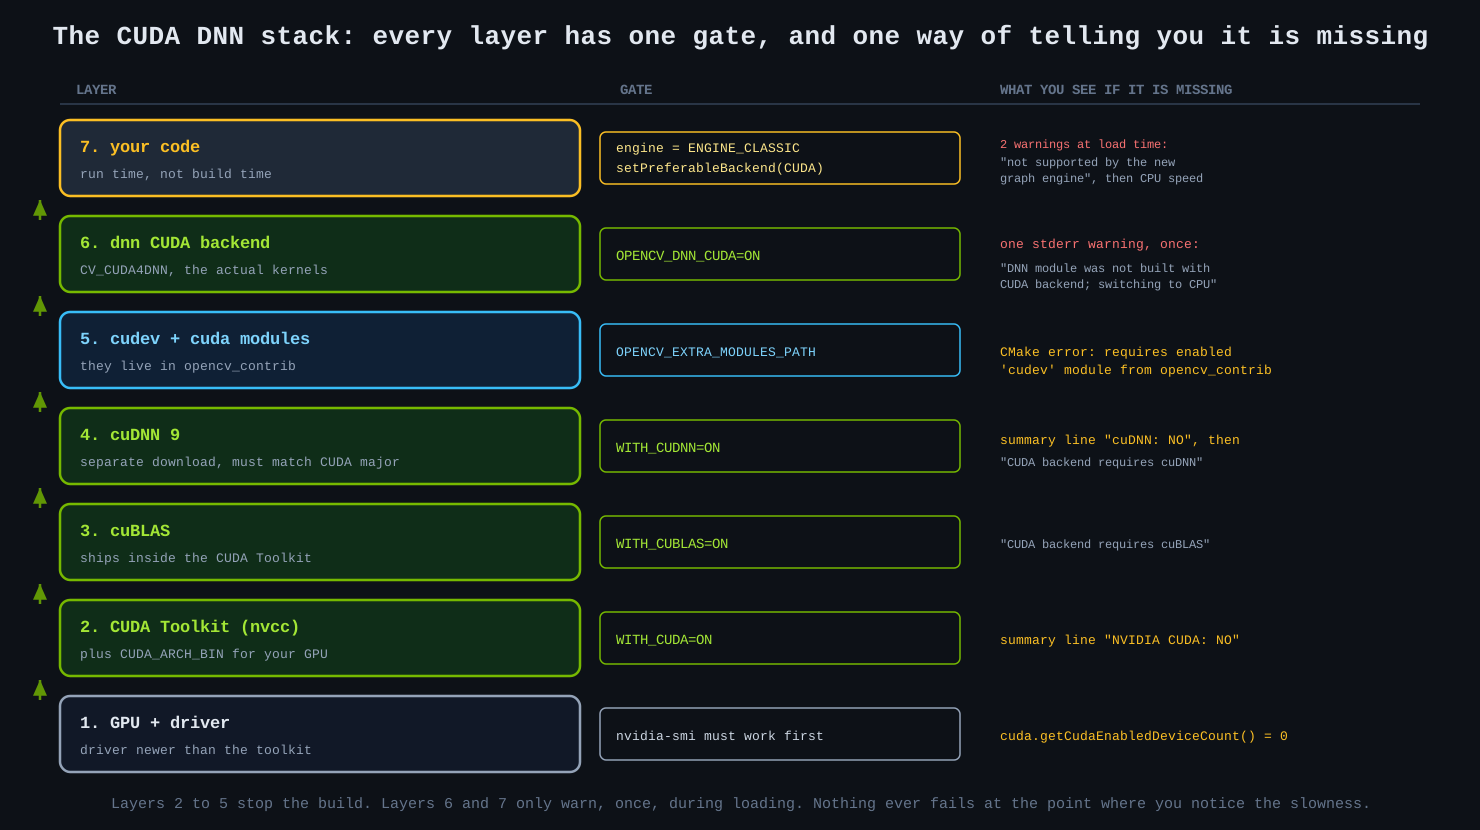
This tutorial covers the whole chain, in order, with the failure mode of each step spelled out. The reason for that emphasis is simple: most layers in this stack fail loudly at configure time, but the two that matter most fail at run time, with at most a couple of warning lines during model loading that are trivially lost in an application log.
By the end you will be able to:
- Decide whether you need a source build at all, and which of the three flavours of “CUDA support” you are actually after.
- Install a coherent NVIDIA® driver, CUDA™ Toolkit and cuDNN combination on Ubuntu 24.04, and pick the right toolkit major version for your GPU.
- Configure OpenCV 5.0.0 with the DNN CUDA backend, and read the CMake summary well enough to know it worked before spending an hour compiling.
- Avoid the NumPy 2 ABI trap that Ubuntu 24.04 sets for you specifically.
- Prove, in five escalating checks, that inference is running on the GPU rather than politely pretending to.
- Survive the OpenCV 5 API reorganisation that hits the moment you compile your first program against it.
Three things people mean by “OpenCV with CUDA”
Before touching a package manager, it is worth being precise, because these three features have different dependencies and different failure modes:
| What you want | Module | Needs cuDNN? | Enabled by |
|---|---|---|---|
GPU image processing, cv::cuda::resize, GpuMat, optical flow, stereo |
cudaarithm, cudawarping, cudaimgproc, … (all in opencv_contrib) |
No |
WITH_CUDA=ON plus opencv_contrib
|
GPU neural network inference through cv::dnn
|
dnn, CUDA backend |
Yes |
WITH_CUDA=ON, WITH_CUDNN=ON, OPENCV_DNN_CUDA=ON
|
GPU inference through ONNX Runtime, the OpenCV 5 ENGINE_ORT path |
dnn, ORT wrapper |
No (ORT brings its own) | WITH_ONNXRUNTIME=ON |
Most people asking for “OpenCV with CUDA” want the second row. It is also the only one of the three that will silently degrade to the CPU instead of erroring out, which is why most of this tutorial is about it.
What each installation route really gives you
| Route | Version you get |
cv::cuda ops |
DNN CUDA backend | New 5.x engine | Effort |
|---|---|---|---|---|---|
pip install opencv-python |
5.0.0.93 | No | No | Yes | seconds |
sudo apt install libopencv-dev (Noble) |
4.6.0 | No | No | n/a | seconds |
sudo apt install python3-opencv (Noble) |
4.6.0 | No | No | n/a | seconds |
| NVIDIA® JetPack™ bundled OpenCV | 4.x | No | No | n/a | preinstalled |
| Source build, this tutorial | 5.0.0 | Yes | Yes | Yes | 1 to 3 hours |
Note: the
opencv-pythonwheels are not built with CUDA and never have been; this is a deliberate decision by the wheel maintainers, not an oversight. They will happily acceptcv2.dnn.DNN_BACKEND_CUDA, print a single warning line to stderr, and run on your CPU. That warning is the entire extent of the complaint. See Part 6.
Prerequisites
-
An NVIDIA® GPU, and its compute capability. You need this number for the build. If you do not know yours, my NVIDIA® CUDA™ Compute Capability tutorial has the full table and shows how to query it. Short version:
nvidia-smi --query-gpu=name,compute_cap --format=csv. - Ubuntu 24.04 LTS (Noble Numbat), x86_64 or ARM64. Everything below also works on 22.04 and 26.04 with the obvious substitutions in the repository URLs.
-
A user with
sudo, and a healthy amount of free disk space. The two source trees are about 480 MB shallow-cloned. The build tree is what grows: a cut-down build of a dozen modules for a single GPU architecture came to 575 MB here, and a full build of all 70-odd modules with their CUDA kernels runs into many gigabytes, so budget 25 GB and watch it if you are near the edge. The installed tree is comparatively small; mine was 164 MB. - At least 8 GB of RAM, plus swap. The CUDA translation units are the memory-hungry part; see Part 5 for the rule of thumb that keeps the OOM killer away.
- Time. On a 12-thread desktop, expect 40 to 90 minutes of compilation. On a Jetson™, plan for an evening.
Here is what Ubuntu 24.04 ships, which is worth knowing because it is all recent enough:
| Tool | Noble version | Enough for OpenCV 5? |
|---|---|---|
| GCC | 13.2 / 13.3 | Yes; OpenCV 5 requires C++17, and 13.x is well past that |
| CMake | 3.28.3 | Yes; ENABLE_CUDA_FIRST_CLASS_LANGUAGE needs >= 3.18, the minimum overall is 3.13 |
| Python | 3.12.3 | Yes |
python3-numpy |
1.26.4 | Careful. See the NumPy 2 trap |
libopencv-dev |
4.6.0 | This is what we are replacing |
Part 1: The NVIDIA stack
Three components, installed bottom up, each of which must be compatible with the one below it: driver, then CUDA Toolkit, then cuDNN.
1.1 The driver
Install the driver first and separately, before any toolkit. A driver is backward compatible with older toolkits, so the newest driver branch is a safe choice regardless of which CUDA version you settle on.
Add NVIDIA’s repository for Noble:
wget https://developer.download.nvidia.com/compute/cuda/repos/ubuntu2404/x86_64/cuda-keyring_1.1-1_all.deb
sudo dpkg -i cuda-keyring_1.1-1_all.deb
sudo apt update
On ARM64, replace x86_64 with sbsa in that URL. Then install the driver:
sudo apt install nvidia-open
nvidia-open is the open GPU kernel module flavour, which is what NVIDIA® recommends for Turing and newer. If your GPU is older than Turing, or you have a reason to prefer the proprietary module, install cuda-drivers instead. Reboot afterwards, and confirm:
nvidia-smi
The single most misread line in this entire tutorial. The “CUDA Version” printed in the top-right corner of
nvidia-smioutput is the highest CUDA version this driver can support. It is not the toolkit you have installed, and it does not change when you install one. A machine with no CUDA Toolkit at all will still cheerfully printCUDA Version: 13.0. The command that tells you what you actually have isnvcc --version.
1.2 Which CUDA Toolkit
Both current majors work with OpenCV 5.0.0, and the choice is not arbitrary:
CUDA 12.x (e.g. cuda-toolkit-12-9) |
CUDA 13.x (e.g. cuda-toolkit-13-0) |
|
|---|---|---|
| Oldest GPU supported | Maxwell (5.0) | Turing (7.5); Maxwell, Pascal and Volta are dropped |
| OpenCV 5.0.0 | Builds | Builds; 5.0.0 already uses the cudaDeviceGetAttribute API that CUDA 13 requires |
ENGINE_ORT GPU path |
Works | Does not; the prebuilt ONNX Runtime GPU package is built against CUDA 12 |
| nvcc C++ standard | C++14 below 12.8, C++17 from 12.8 | C++17 |
| Choose it when | You have a pre-Turing GPU, or you want the ORT GPU path | You have Turing or newer and want the current toolchain |
My recommendation: CUDA 12.9 if you are not sure, because it supports every GPU that OpenCV’s CUDA backend supports and it keeps the ONNX Runtime option open. Move to 13.x when you have a specific reason.
# pick exactly one
sudo apt install cuda-toolkit-12-9     # widest compatibility
sudo apt install cuda-toolkit-13-0     # Turing and newer only
cuda-toolkit-<major>-<minor>, not the barecudaorcuda-toolkitmetapackage. The bare names track the newest release and will drag you to a different major version on some futureapt upgrade, which is a memorable way to break a working build. Also resistsudo apt install nvidia-cuda-toolkitfrom the Ubuntu archive: it is CUDA 12.0, it installs to/usrrather than/usr/local/cuda, and mixing it with the NVIDIA® repository packages produces header and library confusion that is genuinely hard to unpick.
1.3 Putting the toolkit on your PATH
The packages install to /usr/local/cuda-12.9 and register a /usr/local/cuda alternative. Nothing puts nvcc on your PATH, so do it yourself:
cat >> ~/.bashrc << 'EOF'
export PATH=/usr/local/cuda/bin:${PATH}
export LD_LIBRARY_PATH=/usr/local/cuda/lib64:${LD_LIBRARY_PATH}
EOF
source ~/.bashrc

nvcc --version
If you have several toolkits installed side by side, which is perfectly supported, switch between them with:
sudo update-alternatives --config cuda
Tip: when you build OpenCV, do not rely on
/usr/local/cudapointing where you think it does. Pass the toolkit explicitly with-D CUDAToolkit_ROOT=/usr/local/cuda-12.9. It costs nothing and it removes an entire class of “why did it link against the other one” confusion.
1.4 cuDNN
cuDNN is a separate library and it is mandatory for the DNN CUDA backend. There is no way around it: OPENCV_DNN_CUDA=ON without cuDNN is a hard CMake error, by design.
The package name encodes the CUDA major version it was built for, and it must match your toolkit:
# for a CUDA 12.x toolkit
sudo apt install libcudnn9-cuda-12 libcudnn9-dev-cuda-12 libcudnn9-headers-cuda-12

# for a CUDA 13.x toolkit
sudo apt install libcudnn9-cuda-13 libcudnn9-dev-cuda-13 libcudnn9-headers-cuda-13
The -dev and -headers packages are the ones OpenCV’s CMake actually looks for; installing only the runtime package produces a cuDNN: NO summary line and a very confusing hour.
Check what landed:
dpkg -l | grep -i cudnn
1.5 Verify the stack before you build anything
Four commands. All four must succeed before you continue, because every one of them is faster to debug now than in the middle of a CMake configure:
nvidia-smi                                             # driver alive, GPU visible
nvcc --version                                         # toolkit on PATH
ldconfig -p | grep libcudnn | head -3                  # cuDNN visible to the linker
find /usr/include /usr/local/cuda/include \
     -name "cudnn_version*.h" 2>/dev/null              # cuDNN headers present
nvidia-smi --query-gpu=name,compute_cap --format=csv    # the number you need next
The apt cuDNN packages install into the distribution paths, /usr/lib/x86_64-linux-gnu and /usr/include, not into /usr/local/cuda. That is normal and OpenCV’s CMake finds them there.
That last one prints something like NVIDIA GeForce RTX 3060 Laptop GPU, 8.6. Write the 8.6 down; it goes straight into the CMake command.
Part 2: Build dependencies
2.1 The apt list
Grouped by what each group buys you, so you can drop the ones you do not need:
# toolchain, always required
sudo apt install -y build-essential cmake ninja-build git pkg-config

# image codecs
sudo apt install -y libjpeg-dev libpng-dev libtiff-dev libwebp-dev libopenjp2-7-dev

# video: files, streams and cameras
sudo apt install -y libavcodec-dev libavformat-dev libavutil-dev libswscale-dev \
                    libxvidcore-dev libx264-dev libdc1394-dev libv4l-dev v4l-utils \
                    libgstreamer1.0-dev libgstreamer-plugins-base1.0-dev

# GUI: imshow and friends
sudo apt install -y libgtk-3-dev

# maths and parallelism
sudo apt install -y libtbb-dev libeigen3-dev libopenblas-dev liblapacke-dev gfortran

# Python bindings
sudo apt install -y python3-dev python3-numpy python3-venv
A few notes on what is deliberately not in that list:
-
protobuf is not needed. OpenCV builds its own bundled copy by default (
BUILD_PROTOBUF=ON), and a system protobuf that disagrees with it is a classic source of link errors. -
libhdf5-devis only needed by thehdfcontrib module, which you almost certainly do not want. - Qt is an alternative to GTK for the HighGUI backend. GTK is the path of least resistance on Ubuntu.
If you are building for a robot or a container and never call imshow, drop the GUI and video groups entirely; the build gets noticeably faster. Otherwise keep libgtk-3-dev; without it, highgui still builds, but with no backend behind it, and the YOLO with OpenCV DNN and CUDA tutorial’s imshow() call is the first place that will notice.
2.2 Get the distribution OpenCV out of the way
You do not have to remove libopencv-dev, and on a machine with ROS 2 you may not be able to. But you must know which one your compiler and your Python interpreter will find:
dpkg -l | grep -E "libopencv|python3-opencv"
python3 -c "import cv2; print(cv2.__version__, cv2.__file__)" 2>/dev/null
pip list 2>/dev/null | grep -i opencv
If a pip wheel is installed, remove it. A wheel in site-packages shadows a source build in dist-packages, and since the wheel is also called 5.0.0 the version string will not give you away; only cv2.__file__ will. This is the number one reason people finish a three-hour build and still have no GPU support:
pip uninstall opencv-python opencv-contrib-python opencv-python-headless
ros-jazzy-cv-bridge,ros-jazzy-image-procand friends are compiled against Ubuntu’s OpenCV 4.6.0. Installing OpenCV 5 into/usr/localdoes not remove 4.6.0, but it does put a competing set of headers and libraries earlier in most search paths, and OpenCV 5 renamed modules and dropped the C API, so anything that recompiles against the wrong one will fail in interesting ways. The safe pattern is to install OpenCV 5 into its own prefix rather than/usr/local, and to opt in per project; Part 5 shows how.
2.3 The NumPy 2 trap, specific to Ubuntu 24.04
This one catches people who did everything else right.
Ubuntu 24.04’s python3-numpy is 1.26.4. NumPy’s ABI rules are asymmetric:
- A C extension built against NumPy 2.x headers runs fine with NumPy 1.19+ and 2.x.
- A C extension built against NumPy 1.x headers raises
A module that was compiled using NumPy 1.x cannot be run in NumPy 2.xthe moment it meets NumPy 2.
So if you build cv2 against the system NumPy 1.26 headers and later create any virtual environment that pulls NumPy 2, which every modern requirements file does, your hard-won cv2 stops importing.
Check what your interpreter sees:
python3 -c "import numpy; print(numpy.__version__, numpy.get_include())"
If that says 2.x, you are done, carry on. If it says 1.26, build against NumPy 2 headers explicitly. A throwaway virtual environment is the cleanest way to get them without touching the system packages:
python3 -m venv /tmp/ocv-numpy
/tmp/ocv-numpy/bin/pip install -U "numpy>=2"
export NUMPY_INC=$(/tmp/ocv-numpy/bin/python -c "import numpy; print(numpy.get_include())")
echo ${NUMPY_INC}
You will pass ${NUMPY_INC} to CMake in the next part. Keep the virtual environment until the build finishes; the headers have to exist at compile time.
pip install numpyfails on Ubuntu 24.04 witherror: externally-managed-environment. That is PEP 668 protecting the system interpreter, and it is right to. Use a virtual environment, orpip install --user --break-system-packages "numpy>=2"if you genuinely want NumPy 2 as your default.
Part 3: Getting the sources
You need two repositories at the same tag. The DNN CUDA backend depends on the cudev module, and cudev lives in opencv_contrib, along with every cv::cuda:: image-processing module. A CUDA build without opencv_contrib is not a thing that exists.
mkdir -p ~/opencv-build && cd ~/opencv-build
export OPENCV_VERSION=5.0.0

git clone --depth 1 --branch ${OPENCV_VERSION} https://github.com/opencv/opencv.git
git clone --depth 1 --branch ${OPENCV_VERSION} https://github.com/opencv/opencv_contrib.git
opencv_contribis developed against a specificopencvrevision and the two are only guaranteed to work together at the same tag. Mixing 5.0.0 with a5.xbranch tip produces compilation errors deep inside contrib modules that look like OpenCV bugs and are not.
While you are here, note what moved in 5.0.0, because it changes which repository a module lives in:
| Module | In OpenCV 4.x | In OpenCV 5.0.0 |
|---|---|---|
calib3d |
main |
split into geometry, calib, stereo, ptcloud (main) |
features2d |
main | renamed features (main) |
ml |
main | moved to opencv_contrib
|
gapi |
main | moved to opencv_contrib
|
cudev, cuda*
|
contrib | still contrib |
C API (cvXxx) |
deprecated | removed |
| OpenVX backend | main | removed |
Part 4: Configuring the build
4.1 The command
This is the whole configure step. Read the next section before running it; two of these values are specific to your machine.
cd ~/opencv-build

cmake -S opencv -B build -G Ninja \
  -D CMAKE_BUILD_TYPE=Release \
  -D CMAKE_INSTALL_PREFIX=/opt/opencv-5.0.0 \
  -D OPENCV_EXTRA_MODULES_PATH=$(pwd)/opencv_contrib/modules \
  -D CUDAToolkit_ROOT=/usr/local/cuda-12.9 \
  -D CMAKE_CUDA_COMPILER=/usr/local/cuda-12.9/bin/nvcc \
  -D WITH_CUDA=ON \
  -D WITH_CUDNN=ON \
  -D OPENCV_DNN_CUDA=ON \
  -D WITH_CUBLAS=ON \
  -D CUDA_ARCH_BIN=8.6 \
  -D CUDA_FAST_MATH=ON \
  -D ENABLE_FAST_MATH=ON \
  -D ENABLE_CUDA_FIRST_CLASS_LANGUAGE=ON \
  -D WITH_TBB=ON \
  -D WITH_EIGEN=ON \
  -D WITH_FFMPEG=ON \
  -D WITH_GSTREAMER=ON \
  -D WITH_GTK=ON \
  -D BUILD_opencv_python3=ON \
  -D PYTHON3_EXECUTABLE=/usr/bin/python3 \
  -D PYTHON3_NUMPY_INCLUDE_DIRS=${NUMPY_INC} \
  -D BUILD_TESTS=OFF \
  -D BUILD_PERF_TESTS=OFF \
  -D BUILD_EXAMPLES=OFF \
  -D BUILD_DOCS=OFF \
  -D OPENCV_ENABLE_NONFREE=OFF
The machine-specific values are CUDA_ARCH_BIN=8.6, which must be your compute capability, and the two toolkit paths, which must point at the toolkit you actually installed. Drop PYTHON3_NUMPY_INCLUDE_DIRS if your system interpreter already has NumPy 2.
4.2 The flags that decide whether this works
| Flag | What it does, and what happens without it |
|---|---|
WITH_CUDA=ON |
The master switch. Without it there is no CUDA anywhere in OpenCV. |
WITH_CUDNN=ON |
Finds cuDNN. Without it, the cv::cuda modules still build, but the DNN CUDA backend does not. This is the flag people forget. |
OPENCV_DNN_CUDA=ON |
Compiles the DNN CUDA backend itself (CV_CUDA4DNN). Without it, DNN_BACKEND_CUDA is not registered; asking for it at run time prints one warning and falls back to the CPU. |
WITH_CUBLAS=ON |
Required by the DNN CUDA backend for its matrix operations. |
OPENCV_EXTRA_MODULES_PATH |
Must point at opencv_contrib/**modules**, not at the repository root. Point it at the root and CMake tells you it “requires enabled ‘cudev’ module from ‘opencv_contrib’”, which is a confusing way of saying “wrong path”. |
CUDA_ARCH_BIN |
Which GPU architectures to emit code for. Omit it and OpenCV builds for every architecture the toolkit knows: hours of extra compilation and a binary several gigabytes larger. |
ENABLE_CUDA_FIRST_CLASS_LANGUAGE=ON |
Uses CMake’s native CUDA language support and find_package(CUDAToolkit) instead of the vendored, deprecated FindCUDA module. Requires CMake >= 3.18 both here and in projects that consume this OpenCV, and it is worth setting CMAKE_CUDA_COMPILER explicitly alongside it. Recommended for new builds; if it gives you trouble, leaving it OFF falls back to the older, very well trodden path. |
CUDA_FAST_MATH / ENABLE_FAST_MATH
|
Relaxed floating-point maths for CUDA kernels and host code respectively. Fine for vision work; do not use them if you need bit-exact reproducibility. |
BUILD_TESTS / BUILD_PERF_TESTS / BUILD_EXAMPLES=OFF
|
Roughly halves the build time. Turn tests back on only if you intend to run them. |
4.3 Three ways to tell CMake about your GPU
They are mutually redundant, and the order of precedence is CMAKE_CUDA_ARCHITECTURES > CUDA_GENERATION > CUDA_ARCH_BIN:
-D CUDA_ARCH_BIN=8.6                  # recommended: explicit, dotted, one or more values
-D CUDA_ARCH_BIN="7.5;8.6;8.9"        # a binary that runs on several machines
-D CUDA_GENERATION=Ampere             # by codename
-D CUDA_GENERATION=Auto               # detect this machine's GPU
-D CMAKE_CUDA_ARCHITECTURES=86        # CMake style, dotless
The generation names OpenCV 5.0.0 accepts are Maxwell, Pascal, Volta, Turing, Ampere, Lovelace, Hopper, Blackwell and Auto, plus Fermi and Kepler on old toolkits.
CMAKE_CUDA_ARCHITECTURES, the CMake special valuesall,all-majorandnativeare not supported by OpenCV and it will warn you about it. UseCUDA_GENERATION=Auto, which is the equivalent ofnative.
The values you are most likely to need:
| GPU | Compute capability |
|---|---|
| RTX 20 series, Tesla T4 | 7.5 |
| RTX 30 series | 8.6 |
| A100 | 8.0 |
| RTX 40 series | 8.9 |
| H100 | 9.0 |
| RTX 50 series | 12.0 |
| Jetson™ Xavier | 7.2 |
| Jetson™ Orin | 8.7 |
| Jetson™ Thor | 11.0 |
The CUDA Compute Capability tutorial has the complete table and the ways to query it at run time.
DNN_TARGET_CUDA_FP16needs compute capability 5.3 or higher, and it is usually the cheapest speed-up available, since it is a one-line change. Anything in the table above qualifies. Do measure rather than assume, though: on an RTX 3060 Laptop running YOLO11n I saw FP16 land between 0.67x and 0.85x of the FP32 time across interleaved runs, and single-shot comparisons were useless because the GPU clock ramp moved the same configuration between 10 ms and 17 ms. Run any comparison several times, alternating targets.
4.4 Optional: ONNX Runtime, so the new engine can reach the GPU too
This is new in OpenCV 5 and it is genuinely useful. ENGINE_ORT delegates inference to ONNX Runtime, which supports far more operators than either OpenCV engine and has its own CUDA execution provider. OpenCV 5 can even download a prebuilt ONNX Runtime for you:
  -D WITH_ONNXRUNTIME=ON \
  -D DOWNLOAD_ONNXRUNTIME_GPU=ON
Three caveats, all of which matter:
- The GPU package exists only for Linux x86_64 and Windows x64. On AArch64, including every Jetson™, requesting it is a fatal CMake error; use the CPU package or point
ONNXRT_ROOT_DIRat your own build. - The prebuilt ONNX Runtime that OpenCV 5.0.0 downloads (1.25.1) is built against CUDA 12.x and cuDNN 9. If your toolkit is CUDA 13, this path will not load at run time. This is the main reason to prefer a CUDA 12 toolkit.
- It is a second inference runtime inside your process, with its own memory pools and its own version pins. Worth it when you need the operator coverage; unnecessary weight when you do not.
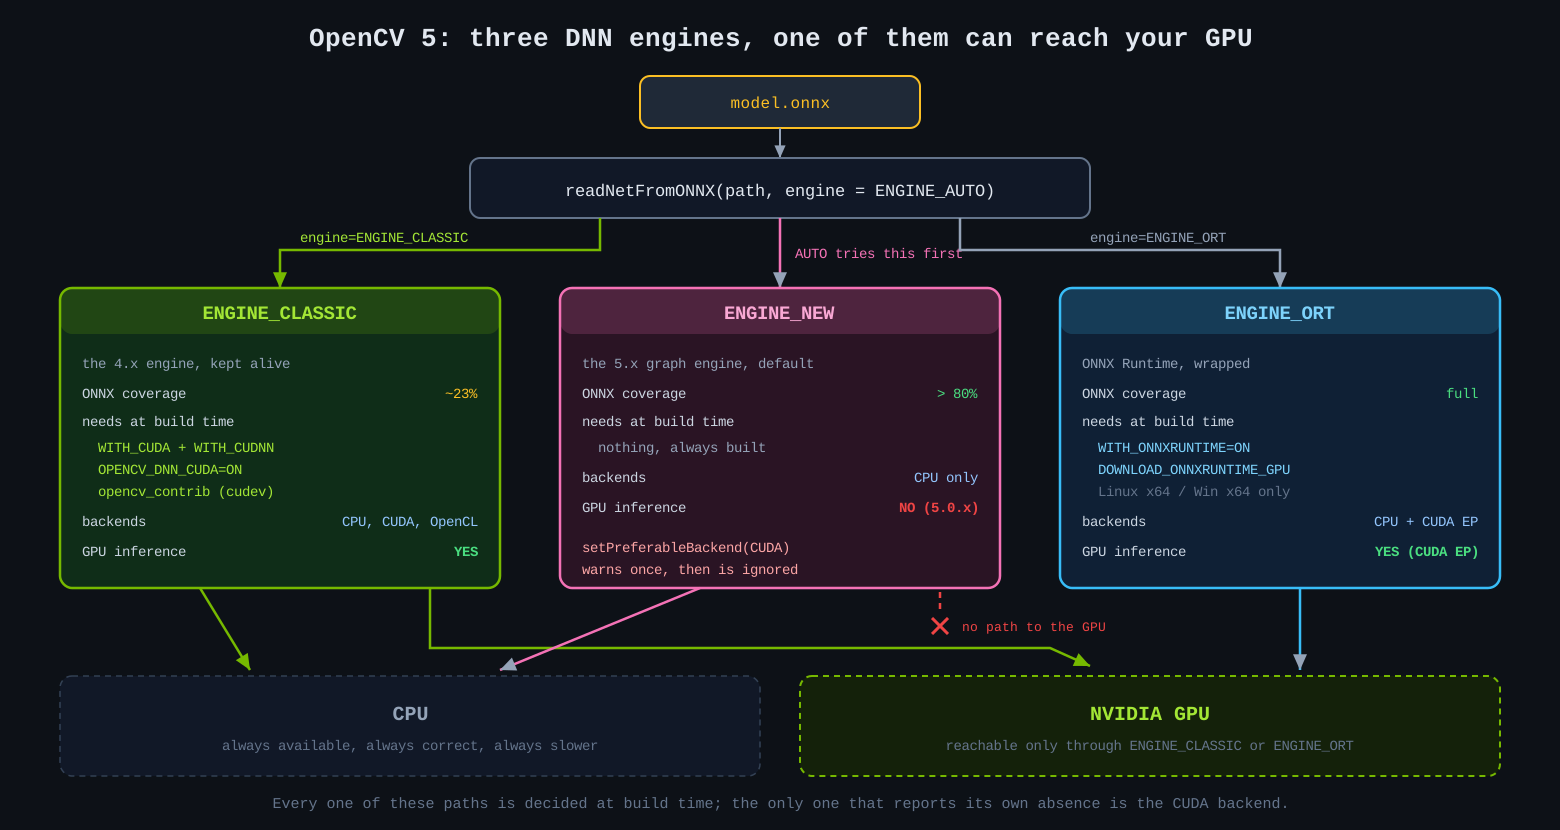
ENGINE_AUTO, the default, tries the new engine first and succeeds, which is exactly why a correct CUDA build can still run on your CPU.
4.5 Reading the summary: six lines decide everything
CMake prints a long configuration summary. Do not skim it. These are the lines that determine whether the next hour of compilation was worth anything:
--   NVIDIA CUDA:                   YES (ver 13.0.88, CUFFT CUBLAS FAST_MATH)
--     NVIDIA GPU arch:             86
--     NVIDIA PTX archs:
--
--   cuDNN:                         YES (ver 9.25.0)
--
--   GUI:
--     GTK+:                        YES (ver 3.24.41)
--       GThread :                  YES (ver 2.80.0)
--       GtkGlExt:                  NO
--
--   Video I/O:
--     FFMPEG:                      YES
--     GStreamer:                   YES (1.24.2)
--     v4l/v4l2:                    YES (linux/videodev2.h)
--
--   Python 3:
--     Interpreter:                 /usr/bin/python3 (ver 3.12.3)
--     Libraries:                   /usr/lib/x86_64-linux-gnu/libpython3.12.so (ver 3.12.3)
--     Limited API:                 NO
--     numpy:                       /home/walter/.local/lib/python3.12/site-packages/numpy/_core/include (ver 2.4.4)
--     install path:                lib/python3.12/dist-packages/cv2/python-3.12
That block is copied from a real run of the command above on a laptop with an RTX 3060 and the CUDA 13.0 toolkit; with a 12.x toolkit only the CUDA version line changes.
Check, in this order:
-
NVIDIA CUDA: YES, and the version is the toolkit you meant to use. -
NVIDIA GPU arch:shows your architecture and nothing else. If it lists ten numbers,CUDA_ARCH_BINdid not take. -
cuDNN: YESwith a version. If this saysNO, stop. Building anyway gives you an OpenCV that cannot do GPU inference, and you will spend the next hour debugging your Python instead of your CMake. -
numpy:points at NumPy 2.x headers, per Part 2.3. -
install path:is wherecv2will land, relative toCMAKE_INSTALL_PREFIX. Remember it; Part 5.3 wires it up. - In the module list further up,
python3andhighguiboth appear underTo be builtand not underUnavailable. -
GUI: GTK+: YESwith a version. If this saysNO,highguistill builds, butimshow()andwaitKey()become no-ops or throw at run time instead of failing here; see Part 8.
-D ENABLE_CONFIG_VERIFICATION=ONto turn every silent downgrade into a configure error. EveryWITH_*option carries aVERIFY HAVE_*clause, so asking forWITH_CUDNN=ONon a machine without cuDNN then fails immediately instead of quietly producing a build without it. Be aware ofWITH_NVCUVIDandWITH_NVCUVENC: they default toONwhenever CUDA is enabled, and they need the NVIDIA Video Codec SDK headers, which the CUDA Toolkit does not ship. You will see this in the configure output even without verification:
-- NVCUVID: Header not found, WITH_NVCUVID requires Nvidia decoding library header
             /usr/local/cuda-13.0/include/nvcuvid.h
CMake Warning: cudacodec::VideoReader requires Nvidia Video Codec SDK.
               Please resolve dependency or disable WITH_NVCUVID=OFF
Unless you have actually installed the SDK, pass -D WITH_NVCUVID=OFF -D WITH_NVCUVENC=OFF to silence it; with ENABLE_CONFIG_VERIFICATION=ON you must, because the warning becomes an error. In general, when verification fails on something you do not care about, turn that WITH_* off explicitly rather than removing the verification.
Part 5: Build and install
5.1 Build
cmake --build build --parallel $(nproc)
That is the fast path, and on a machine with plenty of RAM it is the right one. The constraint is not CPU, it is memory: the CUDA translation units in opencv_contrib are the largest in the project, and each parallel job can take well over 1 GB at peak.
A rule of thumb that has never let me down: one job per 1.5 GB of available RAM, capped at the number of cores.
# 8 GB machine: do not use -j12 just because you have 12 threads
cmake --build build --parallel 5
If you are short on memory, add swap before you start rather than after the OOM killer has taken the build out at 90%:
sudo fallocate -l 8G /swapfile && sudo chmod 600 /swapfile
sudo mkswap /swapfile && sudo swapon /swapfile
c++: fatal error: Killed signal terminated program cc1plusis not a compiler bug. It is the OOM killer. Lower the job count, or add swap.
5.2 Install into a prefix you can delete
The configure command above deliberately used /opt/opencv-5.0.0 rather than /usr/local. This is the single best habit in this whole tutorial:
- Nothing gets mixed with Ubuntu’s or ROS 2’s OpenCV, so nothing you already depend on changes behaviour.
- Uninstalling is
sudo rm -rf /opt/opencv-5.0.0, with no manifest hunting. - You can keep 5.0.0 and 5.1.0 side by side and switch a project between them with one CMake variable.
sudo cmake --install build
If you would rather have it system-wide and accept the coexistence risk, use -D CMAKE_INSTALL_PREFIX=/usr/local and then:
sudo ldconfig
Either way, OpenCV 5 installs itself with opencv5 in the paths, which is different from 4.x:
| Thing | Path |
|---|---|
| Headers | <prefix>/include/opencv5/opencv2/... |
| CMake package | <prefix>/lib/cmake/opencv5/ |
| pkg-config file |
<prefix>/lib/pkgconfig/opencv5.pc, only with OPENCV_GENERATE_PKGCONFIG=ON
|
| Python module | <prefix>/lib/python3.12/dist-packages/cv2/ |
| Environment script | <prefix>/bin/setup_vars_opencv5.sh |
OPENCV_GENERATE_PKGCONFIGis deprecated in OpenCV 5 and off by default. Use CMake’sfind_package(OpenCV)instead; it carries the CUDA dependency information that a.pcfile cannot express.
5.3 Make the installation findable
With a custom prefix, nothing is on any search path yet. That is the point, but it means you have to opt in.
The generated environment script sets LD_LIBRARY_PATH and PYTHONPATH for you:
source /opt/opencv-5.0.0/bin/setup_vars_opencv5.sh
python3 -c "import cv2; print(cv2.__version__)"
For a permanent, per-user setup, a .pth file is tidier than PYTHONPATH because it survives subprocesses and virtual environments:
echo "/opt/opencv-5.0.0/lib/python3.12/dist-packages" \
  > ~/.local/lib/python3.12/site-packages/opencv5.pth
And for the shared libraries, so you do not need LD_LIBRARY_PATH in every terminal:
echo "/opt/opencv-5.0.0/lib" | sudo tee /etc/ld.so.conf.d/opencv5.conf
sudo ldconfig
For your own C++ projects, point CMake at the prefix:
# CMakeLists.txt
cmake_minimum_required(VERSION 3.18)
project(my_vision_app LANGUAGES CXX)
set(CMAKE_CXX_STANDARD 17)

find_package(OpenCV 5 REQUIRED)      # cmake -D OpenCV_DIR=/opt/opencv-5.0.0/lib/cmake/opencv5

add_executable(my_vision_app main.cpp)
target_link_libraries(my_vision_app PRIVATE ${OpenCV_LIBS})
cmake -S . -B build -D OpenCV_DIR=/opt/opencv-5.0.0/lib/cmake/opencv5
/usr/localon a machine that also haslibopencv-dev,find_packagecan pick either one. Always passOpenCV_DIRexplicitly, and check${OpenCV_VERSION}in your CMake output. Guessing here wastes a lot of time.
Part 6: Proving it actually uses the GPU
This is the part most guides end without. It is also the only part that protects you from the two failure modes that produce correct results at CPU speed, which is the worst kind of bug: nothing to search for, nothing in the logs, just a number that is disappointing and no reason why.
Five checks, in increasing order of trustworthiness. Save this as verify_opencv_cuda.py:
#!/usr/bin/env python3
"""Five escalating checks that an OpenCV build can really use the GPU."""

import sys
import time

import numpy as np
import cv2

TARGET_NAMES = {
    cv2.dnn.DNN_TARGET_CPU: "CPU",
    cv2.dnn.DNN_TARGET_CUDA: "CUDA (FP32)",
    cv2.dnn.DNN_TARGET_CUDA_FP16: "CUDA (FP16)",
}


def section(n, title):
    print(f"\n[{n}] {title}")
    print("-" * 64)


# ---------------------------------------------------------------- check 1
section(1, "Which OpenCV am I even importing, and how was it built?")
print(f"version : {cv2.__version__}")
print(f"module  : {cv2.__file__}")

info = cv2.getBuildInformation()
for line in info.splitlines():
    if any(k in line for k in ("NVIDIA CUDA", "NVIDIA GPU arch", "cuDNN", "GTK", "GUI")):
        print(line.strip())

# ---------------------------------------------------------------- check 2
section(2, "Does OpenCV see a CUDA device at run time?")
try:
    n_dev = cv2.cuda.getCudaEnabledDeviceCount()
except AttributeError:
    print("FAIL: this build has no cv2.cuda module at all (WITH_CUDA=OFF)")
    sys.exit(1)

print(f"CUDA devices: {n_dev}")
if n_dev == 0:
    print("FAIL: built without CUDA, or the driver is not visible to this process")
    sys.exit(1)
cv2.cuda.printShortCudaDeviceInfo(0)

# ---------------------------------------------------------------- check 3
section(3, "Can it actually compute something on the device?")
# Use an exactly-defined operation. Do NOT compare cv2.cuda.resize against
# cv2.resize: the CPU path is fixed-point and the CUDA path is floating
# point, so they disagree by a lot on real data and it looks like a fault
# when nothing is wrong.
frame = np.random.randint(0, 128, (1080, 1920), dtype=np.uint8)

gpu_src = cv2.cuda_GpuMat()
gpu_src.upload(frame)
from_gpu = cv2.cuda.add(gpu_src, gpu_src).download()
from_cpu = cv2.add(frame, frame)

diff = int(np.abs(from_gpu.astype(int) - from_cpu.astype(int)).max())
print(f"upload -> kernel -> download on 1920x1080, max difference: {diff}")
print("OK: cv::cuda kernels run and agree with the CPU exactly" if diff == 0
      else "FAIL: the device is returning wrong results")

# ---------------------------------------------------------------- check 4
section(4, "Is the DNN CUDA backend compiled in? (the one that matters)")
# NB: the OpenCV 5 bindings return a NumPy array here, not a list, so it has
# to be converted before it can be truth-tested or printed sensibly.
targets = list(cv2.dnn.getAvailableTargets(cv2.dnn.DNN_BACKEND_CUDA))
if not targets:
    print("FAIL: no CUDA targets registered for the DNN module.")
    print("      Rebuild with OPENCV_DNN_CUDA=ON, WITH_CUDNN=ON, WITH_CUBLAS=ON.")
    sys.exit(1)

for t in targets:
    print(f"available target: {TARGET_NAMES.get(int(t), t)}")
if cv2.dnn.DNN_TARGET_CUDA_FP16 not in targets:
    print("note: no FP16 target; GPU compute capability below 5.3")

# ---------------------------------------------------------------- check 5
section(5, "Is inference measurably faster on the GPU?")
if len(sys.argv) < 2:
    print("skipped: pass an .onnx model as the first argument to run this check")
    sys.exit(0)

model_path = sys.argv[1]


def load(path):
    """OpenCV 5 needs ENGINE_CLASSIC; OpenCV 4 has no engine argument."""
    if int(cv2.__version__.split(".")[0]) >= 5:
        return cv2.dnn.readNetFromONNX(path, cv2.dnn.ENGINE_CLASSIC)
    return cv2.dnn.readNetFromONNX(path)


def bench(backend, target, label, runs=30):
    net = load(model_path)
    net.setPreferableBackend(backend)
    net.setPreferableTarget(target)
    blob = cv2.dnn.blobFromImage(
        np.zeros((640, 640, 3), np.uint8), 1 / 255.0, (640, 640), swapRB=True)

    net.setInput(blob)
    net.forward()                      # warm up: allocations + cuDNN algo search

    start = time.perf_counter()
    for _ in range(runs):
        net.setInput(blob)
        net.forward()
    ms = (time.perf_counter() - start) / runs * 1000.0
    print(f"{label:<22} {ms:8.2f} ms   ({1000.0 / ms:5.1f} FPS)")
    return ms


cpu_ms = bench(cv2.dnn.DNN_BACKEND_OPENCV, cv2.dnn.DNN_TARGET_CPU, "CPU")
gpu_ms = bench(cv2.dnn.DNN_BACKEND_CUDA, cv2.dnn.DNN_TARGET_CUDA, "CUDA FP32")
if cv2.dnn.DNN_TARGET_CUDA_FP16 in targets:
    bench(cv2.dnn.DNN_BACKEND_CUDA, cv2.dnn.DNN_TARGET_CUDA_FP16, "CUDA FP16")

print(f"\nspeed-up: {cpu_ms / gpu_ms:.1f}x")
if cpu_ms / gpu_ms < 1.5:
    print("SUSPICIOUS: this is what a silent CPU fallback looks like.")
Run it:
python3 verify_opencv_cuda.py                  # checks 1 to 4
python3 verify_opencv_cuda.py yolo11s.onnx     # all five
Any ONNX model will do for check 5. If you do not have one to hand, the export script in my YOLO with OpenCV DNN and CUDA tutorial produces a suitable yolo11s.onnx in about a minute.
Why check 4 is the one to trust
cv2.dnn.getAvailableTargets(cv2.dnn.DNN_BACKEND_CUDA) is not a heuristic. Inside the DNN module, HAVE_CUDA is explicitly undefined unless CV_CUDA4DNN was set, which happens only when CUDA, cuBLAS and cuDNN were all found and OPENCV_DNN_CUDA=ON. The backend registry then only registers a CUDA target if it also finds a compatible device at run time. So a non-empty list means: the kernels are in the binary, and this machine has a GPU they can run on.
Compare that with the alternatives:
- Parsing
getBuildInformation()tells you aboutWITH_CUDA, not about the DNN backend. You can haveNVIDIA CUDA: YESand no DNN CUDA support whatsoever. -
getCudaEnabledDeviceCount()covers thecv::cudamodules, notcv::dnn.
The two warnings worth grepping your logs for
If the backend is not there, OpenCV says so exactly once, on stderr, at the first forward():
[ WARN:0@0.123] global net_impl.cpp:234 setUpNet DNN module was not built with CUDA backend; switching to CPU
There is a second, subtler one:
CUDA backend will fallback to the CPU implementation for the layer <name>
That means the backend is active, but one operator has no CUDA implementation and round-trips through host memory. A few of these at the very end of a graph is normal. Dozens scattered through the middle means your ONNX export used operators the classic engine does not implement on GPU; re-export with a lower opset.
And on OpenCV 5 the warning is a different one, in a different place. If your net was loaded with the default
ENGINE_AUTOand the new engine accepted the graph, the classic engine is never reached, so your backend and target requests have nowhere to go. OpenCV 5.0.0 does tell you, atsetPreferableBackendtime rather than atforward()time:[ WARN:0@0.100] global net_impl_backend.cpp:297 setPreferableBackend Back-ends are not supported by the new graph engine for now [ WARN:0@0.100] global net_impl_backend.cpp:345 setPreferableTarget Targets are not supported by the new graph engine for nowTwo lines, printed once, during model loading, where a busy application log will swallow them whole. Everything then runs correctly on the CPU. This is the single most common cause of “I built OpenCV 5 with CUDA and it is slower than 4.x” reports; measured on an RTX 3060 with YOLO11n,
ENGINE_AUTOplusDNN_BACKEND_CUDAcame in at 55 ms against 54 ms for the plain CPU path, whileENGINE_CLASSICwith the same request gave 16 ms. The fix isreadNetFromONNX(path, cv2.dnn.ENGINE_CLASSIC).
OPENCV_FORCE_DNN_ENGINE=1 ./my_app # 1 == ENGINE_CLASSIC
The C++ side
Checks 1, 2 and 4, for when your deployment target has no Python:
#include <opencv2/core.hpp>
#include <opencv2/core/cuda.hpp>
#include <opencv2/dnn.hpp>
#include <iostream>

int main()
{
    std::cout << "OpenCV " << CV_VERSION << "\n";
    std::cout << "CUDA devices: "
              << cv::cuda::getCudaEnabledDeviceCount() << "\n";

    if (cv::cuda::getCudaEnabledDeviceCount() > 0)
        cv::cuda::printShortCudaDeviceInfo(0);

    const auto targets =
        cv::dnn::getAvailableTargets(cv::dnn::DNN_BACKEND_CUDA);
    std::cout << "DNN CUDA targets: " << targets.size() << "\n";

    return targets.empty() ? 1 : 0;
}
OCV=/opt/opencv-5.0.0
g++ -std=c++17 check.cpp -o check \
    -I${OCV}/include/opencv5 -L${OCV}/lib -Wl,-rpath,${OCV}/lib \
    -lopencv_core -lopencv_dnn
./check
The final, unarguable check
Run your real workload and watch the GPU:
nvidia-smi dmon -s u
The sm column should be busy. If it sits at 0% while your program insists it is using CUDA, it is not using CUDA.
Part 7: What breaks the first time you compile against OpenCV 5
The install is done; now your existing code meets it. These are the things that come up immediately.
Paths changed. Headers are in include/opencv5/, the CMake package is lib/cmake/opencv5/, and the pkg-config module, if you generate one, is opencv5. The shared libraries carry SOVERSION 500, so you will see libopencv_core.so.500. Anything hardcoding opencv4 needs updating.
Module names changed, but your includes probably still work. calib3d was split into geometry, calib, stereo and ptcloud, and features2d became features. OpenCV 5.0.0 ships compatibility headers, so #include <opencv2/calib3d.hpp> still compiles and pulls in geometry, stereo and calib; #include <opencv2/features2d.hpp> forwards to features.hpp. What you cannot do any more is link against opencv_calib3d or opencv_features2d; those libraries do not exist. Use ${OpenCV_LIBS} and let CMake sort it out.
ml and gapi moved to opencv_contrib. If you use cv::ml::SVM or G-API, you need the contrib modules, which you already have if you followed this tutorial.
The C API is gone. Not deprecated, removed. IplImage, CvMat, cvLoadImage, cvNamedWindow and the CV_CAP_PROP_* constants no longer exist. If you hit these, you are compiling against the pre-C++ interface, and it needs a real port rather than a build flag.
Python needs the engine argument. Every readNet* function gained an engine parameter defaulting to ENGINE_AUTO. For GPU inference, pass cv2.dnn.ENGINE_CLASSIC. Code that has to work on both 4.x and 5.x has to branch on the version, as the load() helper above does.
ROS 2 coexistence. Ubuntu’s OpenCV 4.6.0 is still installed and cv_bridge is still linked against it. Keeping OpenCV 5 in /opt/opencv-5.0.0 and opting in per project is what makes this survivable. If you install into /usr/local and something starts segfaulting on a cv::Mat crossing a library boundary, that is an ABI mismatch, and there is no runtime fix for it; rebuild the consumer or move the install out of the default search path.
Part 8: Troubleshooting
| Symptom | Cause | Fix |
|---|---|---|
nvcc: command not found |
Toolkit installed but not on PATH
|
export PATH=/usr/local/cuda/bin:$PATH |
nvidia-smi shows CUDA 13 but nvcc says 12.9 |
Not a problem. nvidia-smi reports the driver’s maximum |
Ignore it |
CMake summary: NVIDIA CUDA: NO
|
nvcc not found by CMake |
-D CUDAToolkit_ROOT=/usr/local/cuda-12.9 |
CMake summary: cuDNN: NO
|
Runtime cuDNN installed but not the -dev / -headers packages, or the CUDA major does not match |
Install libcudnn9-dev-cuda-XX matching your toolkit |
DNN: CUDA backend requires cuDNN. Please resolve dependency or disable OPENCV_DNN_CUDA=OFF |
Exactly what it says | Install cuDNN, or drop OPENCV_DNN_CUDA
|
CUDA: OpenCV requires enabled 'cudev' module from 'opencv_contrib' |
OPENCV_EXTRA_MODULES_PATH points at the repo root |
Point it at opencv_contrib/modules
|
nvcc fatal: Unsupported gpu architecture 'compute_61' |
CUDA 13 dropped Maxwell, Pascal and Volta | Install a CUDA 12.x toolkit |
nvcc fatal: unsupported GNU version |
Host compiler newer than the toolkit supports | -D CMAKE_CUDA_HOST_COMPILER=/usr/bin/g++-13 |
c++: fatal error: Killed signal terminated program cc1plus |
Out of memory, not a compiler bug | Fewer parallel jobs, or add swap |
| Build takes hours and produces a huge binary |
CUDA_ARCH_BIN not set, so every architecture is built |
Set it to your compute capability |
import cv2 works but has no CUDA after a successful build |
A pip wheel or python3-opencv shadows your build; the wheel reports the same version string |
pip uninstall opencv-python; check cv2.__file__
|
ModuleNotFoundError: No module named 'cv2' |
Custom prefix is not on sys.path
|
Source setup_vars_opencv5.sh, or add the .pth file |
A module that was compiled using NumPy 1.x cannot be run in NumPy 2.x |
Built against NumPy 1.26 headers | Rebuild with PYTHON3_NUMPY_INCLUDE_DIRS pointing at NumPy 2 |
libopencv_core.so.500: cannot open shared object file |
Loader does not know the custom prefix | Add /etc/ld.so.conf.d/opencv5.conf, then ldconfig
|
DNN module was not built with CUDA backend; switching to CPU |
Built without OPENCV_DNN_CUDA=ON
|
Rebuild; verify cuDNN: YES in the summary |
Correct results, no speed-up, on OpenCV 5, with two not supported by the new graph engine warnings at load time |
ENGINE_AUTO chose the CPU-only new engine, so the backend and target requests were dropped |
readNetFromONNX(path, ENGINE_CLASSIC) |
First forward() takes several seconds |
cuDNN algorithm selection | Expected; warm up before timing |
find_package(OpenCV) finds 4.6.0 |
System package wins the search | Pass -D OpenCV_DIR=/opt/opencv-5.0.0/lib/cmake/opencv5
|
ROS 2 nodes crash after installing to /usr/local
|
ABI mismatch with packages built against 4.6.0 | Install to a private prefix instead |
Dozens of CUDA backend will fallback to the CPU implementation lines |
Operators the classic engine cannot run on the GPU | Re-export the model with a lower opset |
The function is not implemented. Rebuild the library with Windows, GTK+ 2.x or Cocoa support from imshow/waitKey
|
highgui built with no GUI backend, usually because libgtk-3-dev was missing at configure time |
Install libgtk-3-dev, reconfigure and confirm GUI: GTK+: YES in the summary, then rebuild |
The whole thing as one script
For the impatient, and for provisioning a second machine. It assumes Part 1 is already done, so the driver, the toolkit and cuDNN are in place. Read it before running it; the two variables at the top are the ones you must set.
#!/usr/bin/env bash
set -euo pipefail

CUDA_ARCH=8.6                       # <-- YOUR compute capability
CUDA_ROOT=/usr/local/cuda-12.9      # <-- YOUR toolkit
OPENCV_VERSION=5.0.0
PREFIX=/opt/opencv-${OPENCV_VERSION}
JOBS=$(nproc)                       # see Part 5.1 if you have less than 1.5 GB of RAM per core

sudo apt update
sudo apt install -y build-essential cmake ninja-build git pkg-config \
  libjpeg-dev libpng-dev libtiff-dev libwebp-dev libopenjp2-7-dev \
  libavcodec-dev libavformat-dev libavutil-dev libswscale-dev \
  libgstreamer1.0-dev libgstreamer-plugins-base1.0-dev \
  libgtk-3-dev libtbb-dev libeigen3-dev libopenblas-dev liblapacke-dev \
  python3-dev python3-numpy python3-venv

# NumPy 2 headers, so the bindings work under both NumPy 1.x and 2.x
python3 -m venv /tmp/ocv-numpy
/tmp/ocv-numpy/bin/pip install -q -U "numpy>=2"
NUMPY_INC=$(/tmp/ocv-numpy/bin/python -c "import numpy; print(numpy.get_include())")

mkdir -p ~/opencv-build && cd ~/opencv-build
[ -d opencv ]         || git clone --depth 1 --branch ${OPENCV_VERSION} https://github.com/opencv/opencv.git
[ -d opencv_contrib ] || git clone --depth 1 --branch ${OPENCV_VERSION} https://github.com/opencv/opencv_contrib.git

cmake -S opencv -B build -G Ninja \
  -D CMAKE_BUILD_TYPE=Release \
  -D CMAKE_INSTALL_PREFIX=${PREFIX} \
  -D OPENCV_EXTRA_MODULES_PATH=$(pwd)/opencv_contrib/modules \
  -D CUDAToolkit_ROOT=${CUDA_ROOT} -D CMAKE_CUDA_COMPILER=${CUDA_ROOT}/bin/nvcc \
  -D WITH_CUDA=ON -D WITH_CUDNN=ON -D OPENCV_DNN_CUDA=ON -D WITH_CUBLAS=ON \
  -D CUDA_ARCH_BIN=${CUDA_ARCH} -D CUDA_FAST_MATH=ON -D ENABLE_FAST_MATH=ON \
  -D ENABLE_CUDA_FIRST_CLASS_LANGUAGE=ON \
  -D WITH_TBB=ON -D WITH_EIGEN=ON -D WITH_FFMPEG=ON -D WITH_GSTREAMER=ON -D WITH_GTK=ON \
  -D BUILD_opencv_python3=ON \
  -D PYTHON3_EXECUTABLE=/usr/bin/python3 \
  -D PYTHON3_NUMPY_INCLUDE_DIRS=${NUMPY_INC} \
  -D BUILD_TESTS=OFF -D BUILD_PERF_TESTS=OFF -D BUILD_EXAMPLES=OFF -D BUILD_DOCS=OFF

# Fail early rather than after an hour of compilation
grep -q "^#define HAVE_CUDA$"  build/opencv2/cvconfig.h || { echo "CUDA not configured";  exit 1; }
grep -q "^#define HAVE_CUDNN$" build/opencv2/cvconfig.h || { echo "cuDNN not configured"; exit 1; }

cmake --build build --parallel ${JOBS}
sudo cmake --install build

echo "${PREFIX}/lib" | sudo tee /etc/ld.so.conf.d/opencv5.conf
sudo ldconfig
echo "Done. source ${PREFIX}/bin/setup_vars_opencv5.sh"
When not to do any of this
Building OpenCV from source is a real cost: an afternoon, a maintenance burden, and a machine that is now slightly non-standard. Skip it when:
-
You only need CPU inference. OpenCV 5’s new engine is fast, covers 80% of ONNX, and arrives with
pip install opencv-python. For many models on a modern CPU, that is genuinely enough. - You need maximum throughput. TensorRT compiles the graph for your exact GPU with fusion and INT8 calibration that OpenCV does not attempt, and it will beat the CUDA backend by a wide margin.
-
Your model is exotic. If the classic engine cannot load it, no amount of building will help. Use ONNX Runtime, either standalone or through
ENGINE_ORT. - You are on a Jetson™ and short on time. JetPack™ ships a working OpenCV; building your own on the device takes hours. Cross-compile or use a container instead.
-
You just want it reproducible. A
Dockerfilewrapping the script above, based onnvidia/cuda:12.9.1-cudnn-devel-ubuntu24.04, is a better artefact than a hand-built machine, and it moves to the next host unchanged.
Conclusion
The build itself is a single CMake command. What makes this a tutorial rather than a one-liner is that the stack around it has seven layers, each with its own gate, and that OpenCV’s most consequential failures are the quiet ones: the missing WITH_CUDNN that produces a CUDA build with no DNN acceleration, the NumPy 1.26 headers that break import cv2 a month later, and, new in OpenCV 5, the default engine that accepts your GPU request and then runs on the CPU without a word.
Get the configure summary right, run the five checks, and you have an OpenCV 5 that does what it says. Then go and use it: my YOLO with OpenCV DNN and CUDA tutorial is the natural next step, and it exercises every part of what you just built.
If this saved you an afternoon, or if you hit a failure mode I have not listed, let me know.
Happy building!
References
- OpenCV 5.0.0 release and the OpenCV 5 wiki page, which is the authoritative list of what changed
- OpenCV 5.0 documentation and the CUDA module introduction
- OpenCV 5 announcement and my write-up, OpenCV 5 is Finally Here!
- CUDA Installation Guide for Linux, for the current package names and host-compiler support matrix
- Installing cuDNN on Linux
- NumPy 2 migration guide, for the ABI rules behind Part 2.3
-
ONNX Runtime CUDA execution provider, for the
ENGINE_ORTversion requirements -
NVIDIA® CUDA™ Compute Capability, for the
CUDA_ARCH_BINvalue - Detecting Everyday Objects with YOLO, OpenCV DNN and CUDA, the tutorial this build exists to serve