Introduction
In my previous tutorial, Understanding ROS 2, I provided an overview of ROS 2, its features, and its significance in the robotics community. Now, it’s time to get hands-on and set up your ROS 2 environment. In this tutorial, I will guide you through the installation process of ROS 2 on your system, ensuring you have a functional ROS 2 setup ready for your robotics projects.
Prerequisites
While ROS 2 can be installed on various operating systems, this tutorial focuses on installing ROS 2 on Ubuntu, which is the most commonly used platform for ROS development. Ensure you have the following prerequisites:
- A 64-bit version of Ubuntu 20.04 (Focal Fossa), 22.04 (Jammy Jellyfish), or 24.04 (Noble Numbat) installed on your machine.
- A user account with sudo privileges.
- Basic knowledge of using the terminal and command-line interface.
- An active internet connection to download the necessary packages.
ROS 2 can be installed from binary packages or built from source. In this tutorial, we will focus on installing ROS 2 using binary packages, which is the recommended method for most users.
This guide applies to Debian-based Linux distributions and supports both x86_64 and ARM64 architectures.
Step 1: Set Up Your Sources
Before installing ROS 2, you need to set up your system to accept software from the ROS 2 repositories. Open a terminal and run the following commands:
sudo apt update
sudo apt install -y software-properties-common
sudo add-apt-repository universe
Step 2: Configure the Locales
ROS 2 requires UTF-8 locales to be set up on your system. You can configure the locales by running the following commands:
sudo apt update && sudo apt install locales
sudo locale-gen en_US en_US.UTF-8
sudo update-locale LC_ALL=en_US.UTF-8 LANG=en_US.UTF-8
export LANG=en_US.UTF-8
Verify that the locale settings are correct:
locale # verify settings
The correct output should look like:
LANG=en_US.UTF-8
LANGUAGE=
LC_CTYPE="en_US.UTF-8"
LC_NUMERIC="en_US.UTF-8"
LC_TIME="en_US.UTF-8"
LC_COLLATE="en_US.UTF-8"
LC_MONETARY="en_US.UTF-8"
LC_MESSAGES="en_US.UTF-8"
LC_PAPER="en_US.UTF-8"
LC_NAME="en_US.UTF-8"
LC_ADDRESS="en_US.UTF-8"
LC_TELEPHONE="en_US.UTF-8"
LC_MEASUREMENT="en_US.UTF-8"
LC_IDENTIFICATION="en_US.UTF-8"
LC_ALL=en_US.UTF-8
Step 3: Add the ROS 2 Repository
Next, you need to add the ROS 2 repository to your system’s package sources. Run the following commands:
sudo apt update && sudo apt install curl -y
export ROS_APT_SOURCE_VERSION=$(curl -s https://api.github.com/repos/ros-infrastructure/ros-apt-source/releases/latest | grep -F "tag_name" | awk -F\" '{print $4}')
curl -L -o /tmp/ros2-apt-source.deb "https://github.com/ros-infrastructure/ros-apt-source/releases/download/${ROS_APT_SOURCE_VERSION}/ros2-apt-source_${ROS_APT_SOURCE_VERSION}.$(. /etc/os-release && echo ${UBUNTU_CODENAME:-${VERSION_CODENAME}})_all.deb"
sudo dpkg -i /tmp/ros2-apt-source.deb
sudo apt update
sudo apt upgrade -y
These commands automatically detect and install the latest ROS APT source package for your Ubuntu codename. They also ensure you can receive future ROS 2 package updates using the standard sudo apt upgrade -y command.
Step 4: Install ROS 2
Now that your system is set up to access the ROS 2 repositories, you can install ROS 2. There are several ROS 2 installation options available, depending on your needs. For a complete desktop installation, run the following command:
sudo apt install ros-<distro>-desktop
Replace <distro> with the name of the ROS 2 distribution you want to install.
I recommend installing LTS distributions for better stability, and long-term support. While non-LTS distributions may have the latest features, they might not be as stable for production use, and they have a shorter support cycle (18 months). LTS distributions receive updates and support for five years, making them more suitable for long-term projects.
Here are the available LTS distributions:
- For Ubuntu 22.04, replace
<distro>withhumble. - For Ubuntu 24.04, replace
<distro>withjazzy. - For Ubuntu 26.04 (from May 2026), replace
<distro>withlyrical.
If you prefer a minimal installation, recommended for headless systems or robot deployments, you can install the ROS 2 core packages:
sudo apt install ros-<distro>-ros-core
Step 5: Install Development Tools
To develop ROS 2 packages or compile packages from source, you will need to install additional development tools and ROS 2 build tools. Run the following command:
sudo apt update && sudo apt install ros-dev-tools
Initialize rosdep:
sudo rosdep init
rosdep update
Step 6: Set Up Your Environment
Once ROS 2 is installed, you need to set up your environment to use ROS 2 commands and tools. You can do this by sourcing the ROS 2 setup script. Add the following line to your ~/.bashrc file:
source /opt/ros/<distro>/setup.bash
Replace <distro> with the name of the ROS 2 distribution you installed.
After editing your ~/.bashrc file, run the following command to apply the changes:
source ~/.bashrc
Step 7: [Optional] Create a ROS 2 Workspace
While not strictly necessary for using ROS 2, creating a ROS 2 workspace is recommended for developing your own packages and managing your projects. To create a ROS 2 workspace, follow these steps:
mkdir -p ~/ros2_ws/src
cd ~/ros2_ws
colcon build
ros2_ws is the name of your workspace, and you can replace it with any name you prefer.
Running colcon build on an empty src directory simply creates the workspace structure; it will finish quickly without building anything.
After creating your workspace, source the workspace setup script by adding the following line to your ~/.bashrc file:
source ~/ros2_ws/install/setup.bash
Then, apply the changes by running:
source ~/.bashrc
After this, you can verigy that your ROS 2 environment is set up correctly by running:
echo $COLCON_PREFIX_PATH
to verify that the workspace paths are included in your ROS 2 environment. You should see the path to your workspace’s install directory in the output.
Then, you can also use this command:
ros2 pkg list
to verify that ROS 2 packages are available in your environment. You should see a list of ROS 2 packages, confirming that your installation is successful:
action_msgs
action_tutorials_cpp
action_tutorials_interfaces
action_tutorials_py
actionlib_msgs
actuator_msgs
ament_black
ament_clang_format
ament_cmake
[...]
A Useful ROS 2 Terminal Configuration
When I open a new terminal console, I like to view all the environment variables related to ROS 2. To do this, I create a custom configuration file to be sourced by the ~/.bashrc file.
Open a new file called .ros2_config.bash in your home directory:
gedit ~/.ros2_config.bash
You can use nano instead of gedit if you prefer a terminal-based text editor.
Then, copy and paste the following code into the file:
#############################################################################
# ROS
machine_ip=(`hostname -I`)
# You MUST set dist to the ROS 2 distribution you installed (humble, jazzy, lyrical, or rolling).
dist=jazzy # Options: humble, jazzy, lyrical, rolling
domain_id=0
ws_path=~/ros2_ws
#############################################################################
# Configuration
export ROS_DOMAIN_ID=${domain_id}
# Distribution path
source /opt/ros/${dist}/setup.bash
# Devel paths
source ${ws_path}/install/local_setup.bash
# Middleware
export RMW_IMPLEMENTATION=rmw_fastrtps_cpp
#############################################################################
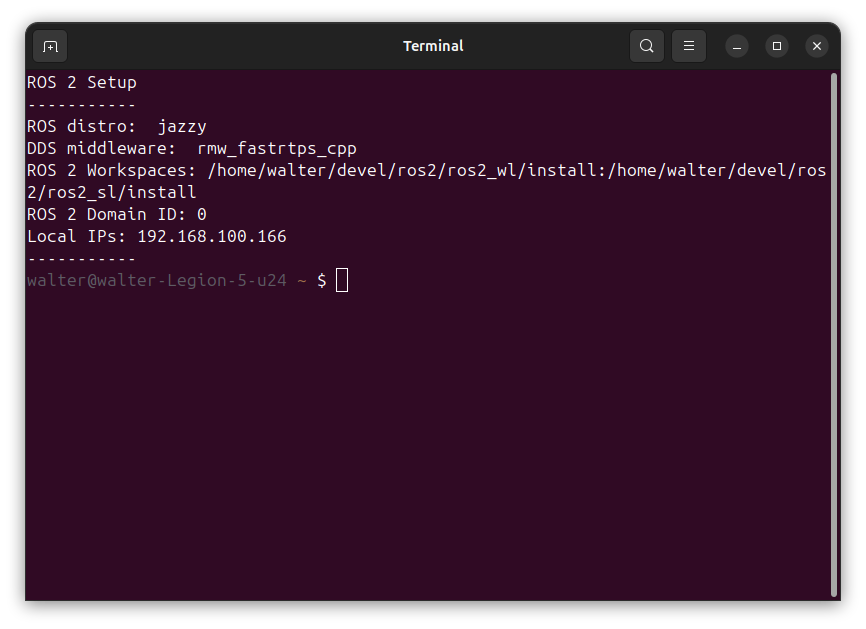
echo "ROS 2 Setup"
echo "-----------"
echo 'ROS distro: ' $ROS_DISTRO
echo 'DDS middleware: ' $RMW_IMPLEMENTATION
echo 'ROS 2 Workspaces:' $COLCON_PREFIX_PATH
echo 'ROS 2 Domain ID:' $ROS_DOMAIN_ID
echo 'Local IPs:' $(hostname -I)
echo "-----------"
Then, add this line to the end of your ~/.bashrc file:
source ~/.ros2_config.bash
Now, every time you open a new terminal, your ROS 2 environment will be set up according to your preferences, and you’ll see a summary of your ROS 2 configuration:
In future tutorials, I will explain in detail the meaning of the environment variables ROS_DOMAIN_ID and RMW_IMPLEMENTATION, and how to use them effectively in your ROS 2 projects.
Conclusion
In this tutorial, you learned how to install ROS 2 on your system, set up your environment, and create a custom terminal configuration for a better development experience. By following these steps, you can ensure that your ROS 2 environment is tailored to your needs and that you have quick access to important information about your setup.
With ROS 2 installed and configured, you’re now ready to start exploring the powerful features of ROS 2 and begin developing your own robotics applications.
Test your knowledge
1. What is the recommended installation method for ROS 2 on Ubuntu?
- a) Building from source
- b) Installing via binary packages using
apt - c) Using a Docker image
- d) Using pip
Show correct answer
b) Installing via binary packages using apt
Installing from binary packages is the recommended method for most users. Building from source is possible but is typically only necessary for advanced use cases or when the latest unreleased features are needed.
2. Why does ROS 2 require UTF-8 locale configuration?
- a) To support non-ASCII node names
- b) Because the ROS 2 build tools and package names depend on proper locale settings
- c) To enable multilingual documentation generation
- d) To allow YAML parameter files with unicode characters
Show correct answer
b) Because the ROS 2 build tools and package names depend on proper locale settings
ROS 2 requires UTF-8 locales to be set up on the system before installation. Without the correct locale, package tools may misbehave during installation or use.
3. Which commands are needed to initialize rosdep? (select all that apply)
- a)
sudo rosdep init - b)
rosdep update - c)
sudo apt install rosdep - d)
rosdep install --from-paths src
Show correct answers
a) sudo rosdep init, b) rosdep update
After installing the ROS 2 development tools, you must run
sudo rosdep init followed by rosdep update to initialize rosdep and fetch the latest package dependency database.
4. What does sourcing /opt/ros/<distro>/setup.bash do?
- a) Installs the ROS 2 distribution
- b) Sets up environment variables so ROS 2 commands and tools are available in the current shell
- c) Creates a new ROS 2 workspace
- d) Updates the ROS 2 package index
Show correct answer
b) Sets up environment variables so ROS 2 commands and tools are available in the current shell
The setup script configures the shell environment (PATH, AMENT_PREFIX_PATH, etc.) so that ROS 2 commands like
ros2 run and ros2 pkg list are accessible.
5. Which environment variable is used to identify the active ROS 2 workspace paths?
- a)
ROS_DISTRO - b)
ROS_DOMAIN_ID - c)
COLCON_PREFIX_PATH - d)
RMW_IMPLEMENTATION
Show correct answer
c) COLCON_PREFIX_PATH
COLCON_PREFIX_PATH lists the install directories of all sourced ROS 2 workspaces. Running echo $COLCON_PREFIX_PATH after sourcing the workspace setup script confirms that the workspace is correctly included in the environment.
What’s next
The next tutorial of this series explains how to start ROS 2 nodes: Starting ROS 2 Nodes.
Happy robotics programming! ![]()